Status page SSO
Put a private status page behind your identity provider, so only people who can sign in to it can see the page. You create a reusable SSO connection once, over SAML or OpenID Connect, then attach it to as many status pages as you need.
Prerequisites
- A Hyperping Business plan. See pricing for plan details.
- A private status page, or a page you want to make private.
- Admin access to your identity provider.
Pick a connection type
The New SSO connection dialog lists five connection types, each billed monthly per connection:
| Connection type | Protocol | Price |
|---|---|---|
| Azure AD / Entra ID | Direct SAML | $49/mo |
| Okta | Direct SAML | $49/mo |
| Google Workspace | Direct SAML | $49/mo |
| OpenID Connect: Auth0, Keycloak, Okta, Entra ID and any other OpenID Connect provider | OpenID Connect | $49/mo |
| Other providers: JumpCloud, OneLogin, Ping Identity and other SAML providers | SAML, set up in a hosted portal | $99/mo |
One connection can protect several status pages, and you pay once per connection. Okta and Entra ID work over SAML or OpenID Connect: pick the protocol your identity team prefers. On plans that include SSO connections, the dialog shows Included instead of a price.
Step 1: Create the SSO connection
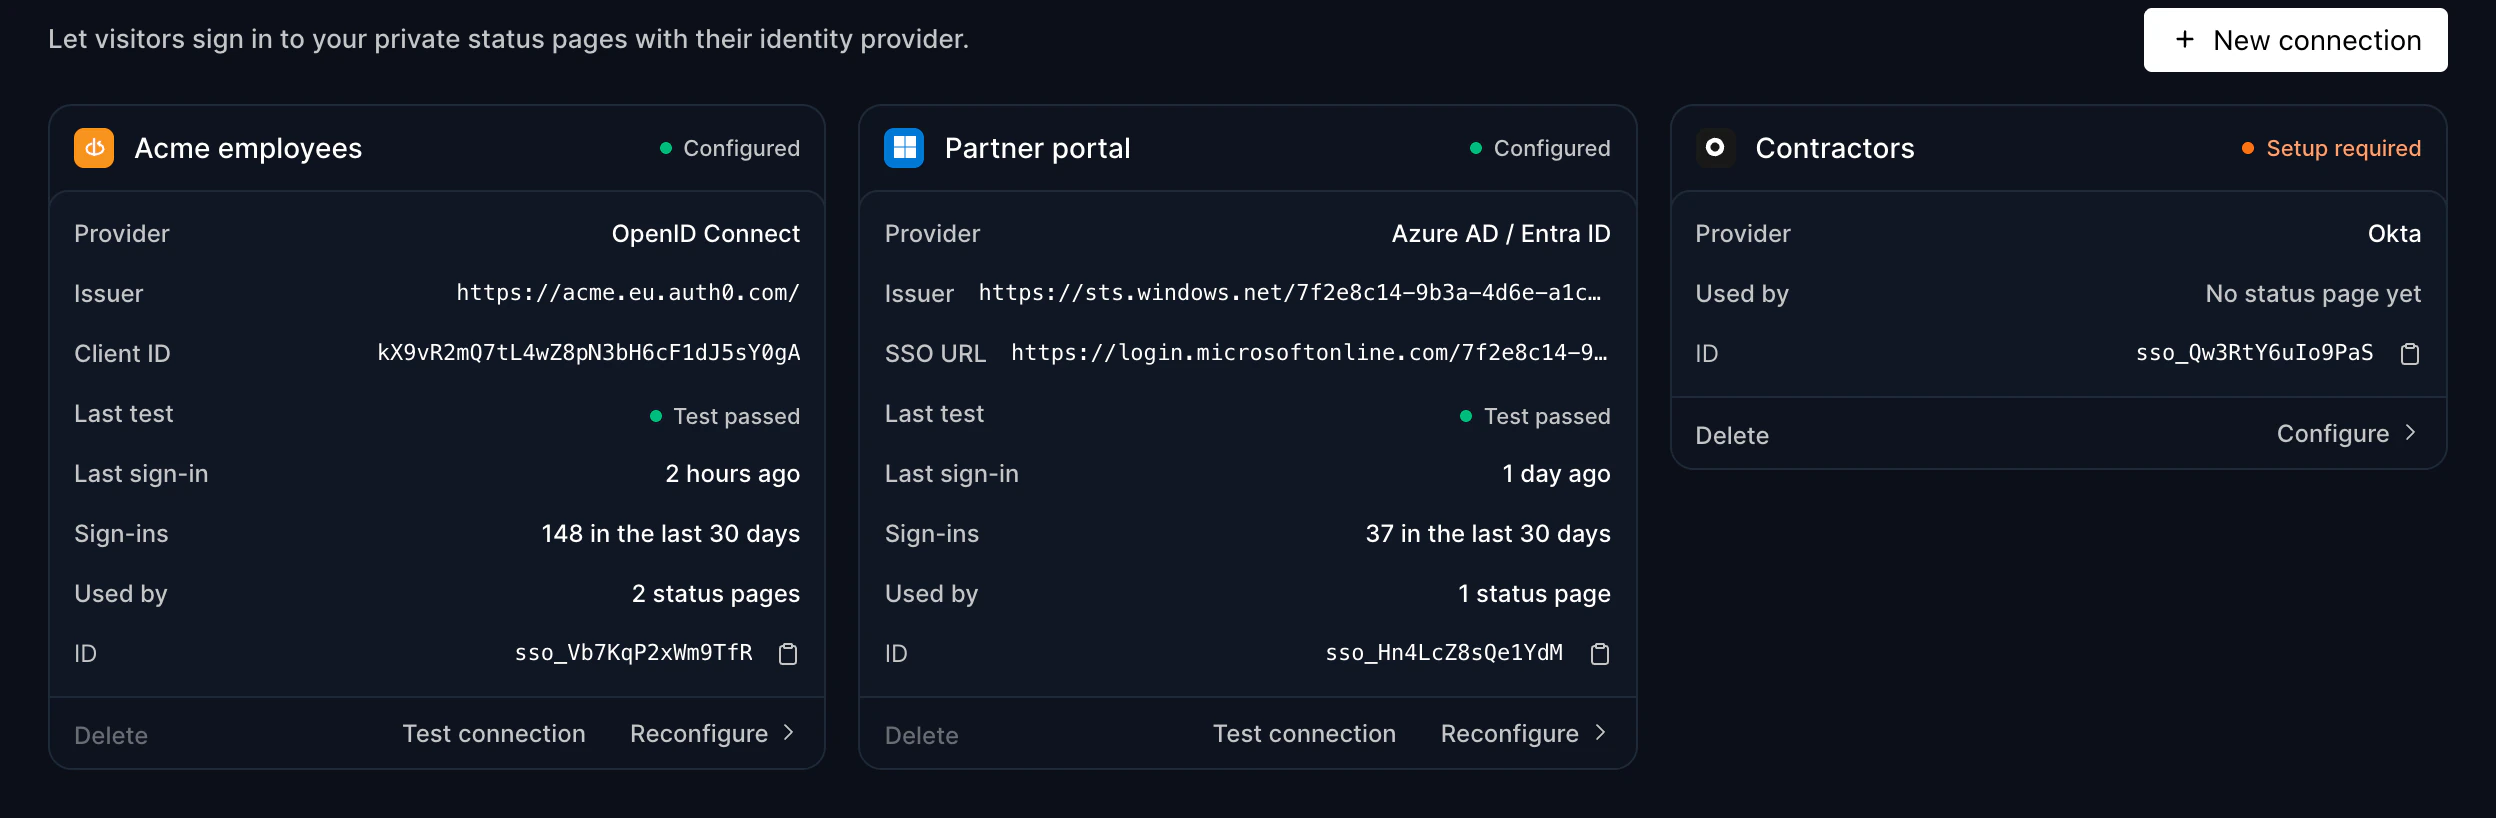
Go to Status PagesSSO Connections to manage your connections.
- Create the connection
Click New connection, pick the identity provider, give the connection a Connection name such as "Acme employees", and click Create connection.
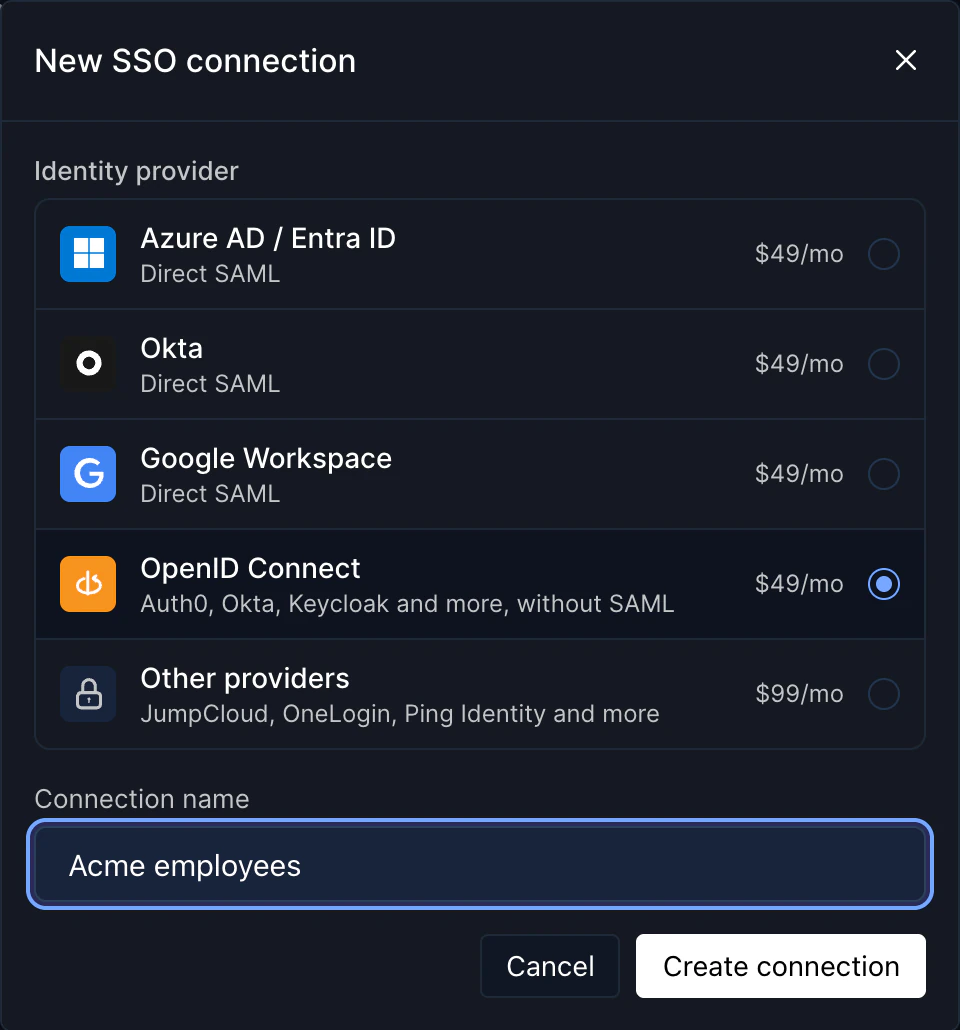
The New SSO connection dialog, with the price of each connection type
The new card shows Setup required until you configure the connection. Follow the section below that matches its type.
Step 2a: Configure an Azure AD / Entra ID connection
Click Configure on the connection card. Under 1. In your identity provider, the dialog shows the two values to copy into an Entra enterprise application:
| Entra field | Value |
|---|---|
| Identifier (Entity ID) | https://api.hyperping.io/statuspage/saml/sp |
| Reply URL (Assertion Consumer Service URL) | https://api.hyperping.io/v1/auth/sso/statuspage/azure/callback |
- Create the enterprise application
In the Microsoft Entra admin center, create a non-gallery enterprise application, open its Single sign-on → SAML settings, and paste the two values above. The app creation flow is the same as in the Entra ID guide.
- Assign users
Under Users and groups, assign the people or groups who should be able to view the status page.
- Paste the metadata into Hyperping
Copy the App Federation Metadata Url from the SAML Certificates section and paste it into Federation Metadata URL. To type the Login URL (SSO URL) and Azure AD Identifier (Issuer) yourself, click Enter the values manually instead.
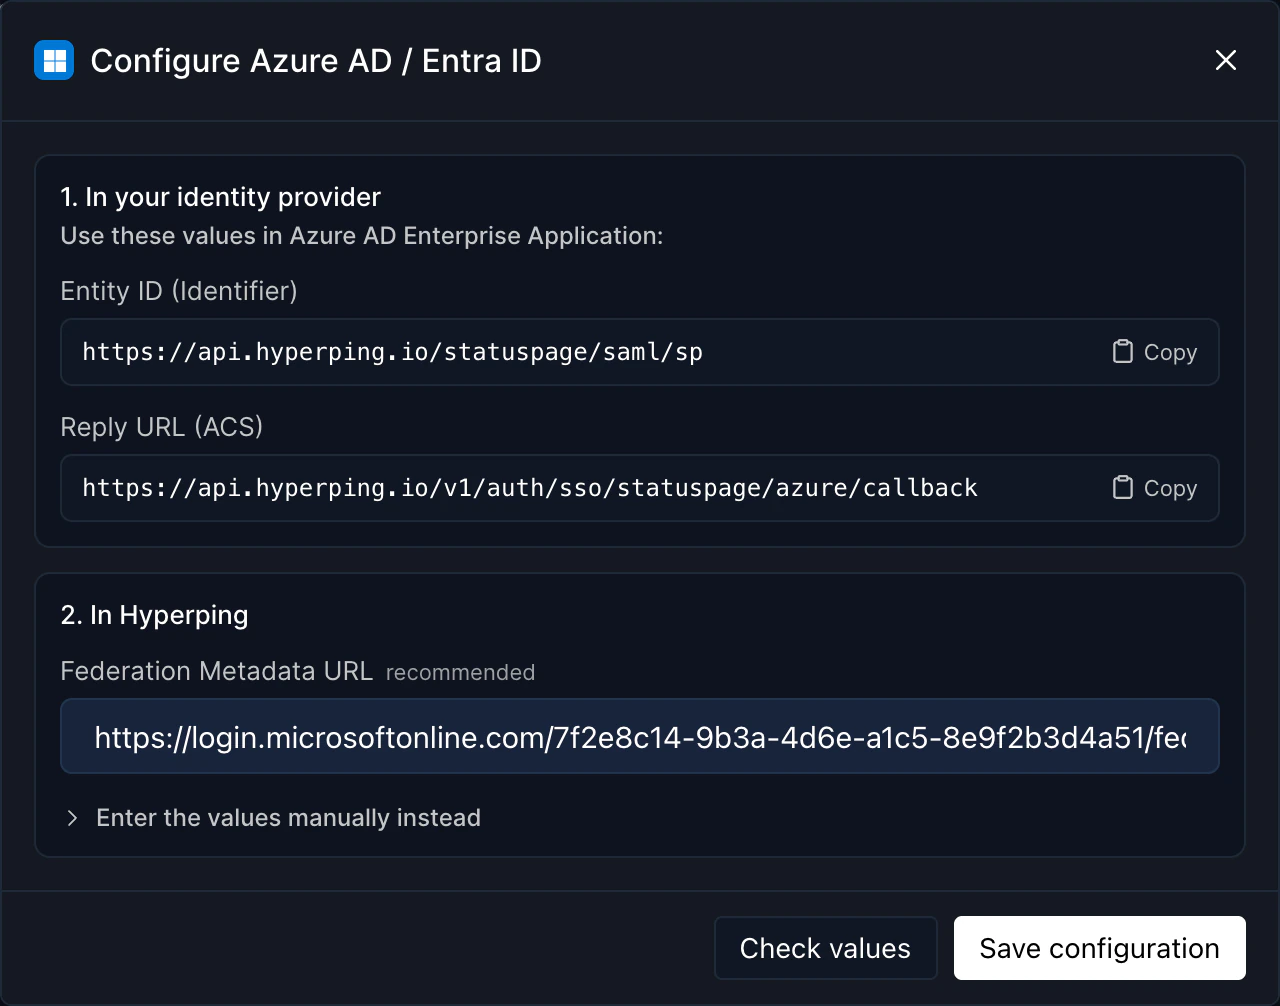
The Azure AD / Entra ID dialog: the values to copy, then the metadata URL - Check, save and test
Click Check values, then Save configuration. Then click Test connection to run a real sign-in against your tenant. The card shows Test passed under Last test once it works.
Step 2b: Configure an Okta or Google Workspace connection
Okta and Google Workspace connections are Direct SAML too, and work like Azure AD: click Configure on the connection card and follow the steps listed in the dialog.
- Create the SAML app in your IdP
In Okta, create a SAML 2.0 app integration. In Google Admin, add a custom SAML app. Paste the two values shown in the dialog (entity ID and ACS URL), and send the user's email as the Name ID.
- Assign users
Assign the people or groups who should be able to view the status page. In Google Workspace, also turn the app ON under User access: new apps are off for everyone by default.
- Paste the metadata into Hyperping
For Okta, paste the app's Metadata URL from the Sign On tab. For Google, upload the GoogleIDPMetadata.xml file. You can also enter the SSO URL and issuer manually.
- Check, save and test
Click Check values, then Save configuration, then Test connection. The card shows Test passed once it works.
Step-by-step IdP screens are in the Okta and Google Workspace guides. Use the values from the status page dialog, not the dashboard ones.
Step 2c: Configure an OpenID Connect connection
Use this type for Auth0, Keycloak, or any provider your identity team runs over OpenID Connect, Okta and Entra ID included.
- Create the application in your identity provider
Click Configure on the connection card and pick your provider at the top of the dialog: Auth0, Okta, Microsoft Entra ID or Other. Follow the steps listed for it: create a web application with a client secret, and register this callback URL in it:
https://api.hyperping.io/v1/auth/sso/oidc/callback - Decide who can view the page
Everyone who can sign in to this application can view the status pages that use the connection. Assign the right people or groups in your identity provider. In Auth0, keep only the right connections on the application's Connections tab, as the Auth0 guide explains.
- Paste the values into Hyperping
Fill in the issuer (Domain for Auth0), the Client ID and the Client secret. Click Check values, then Save configuration.
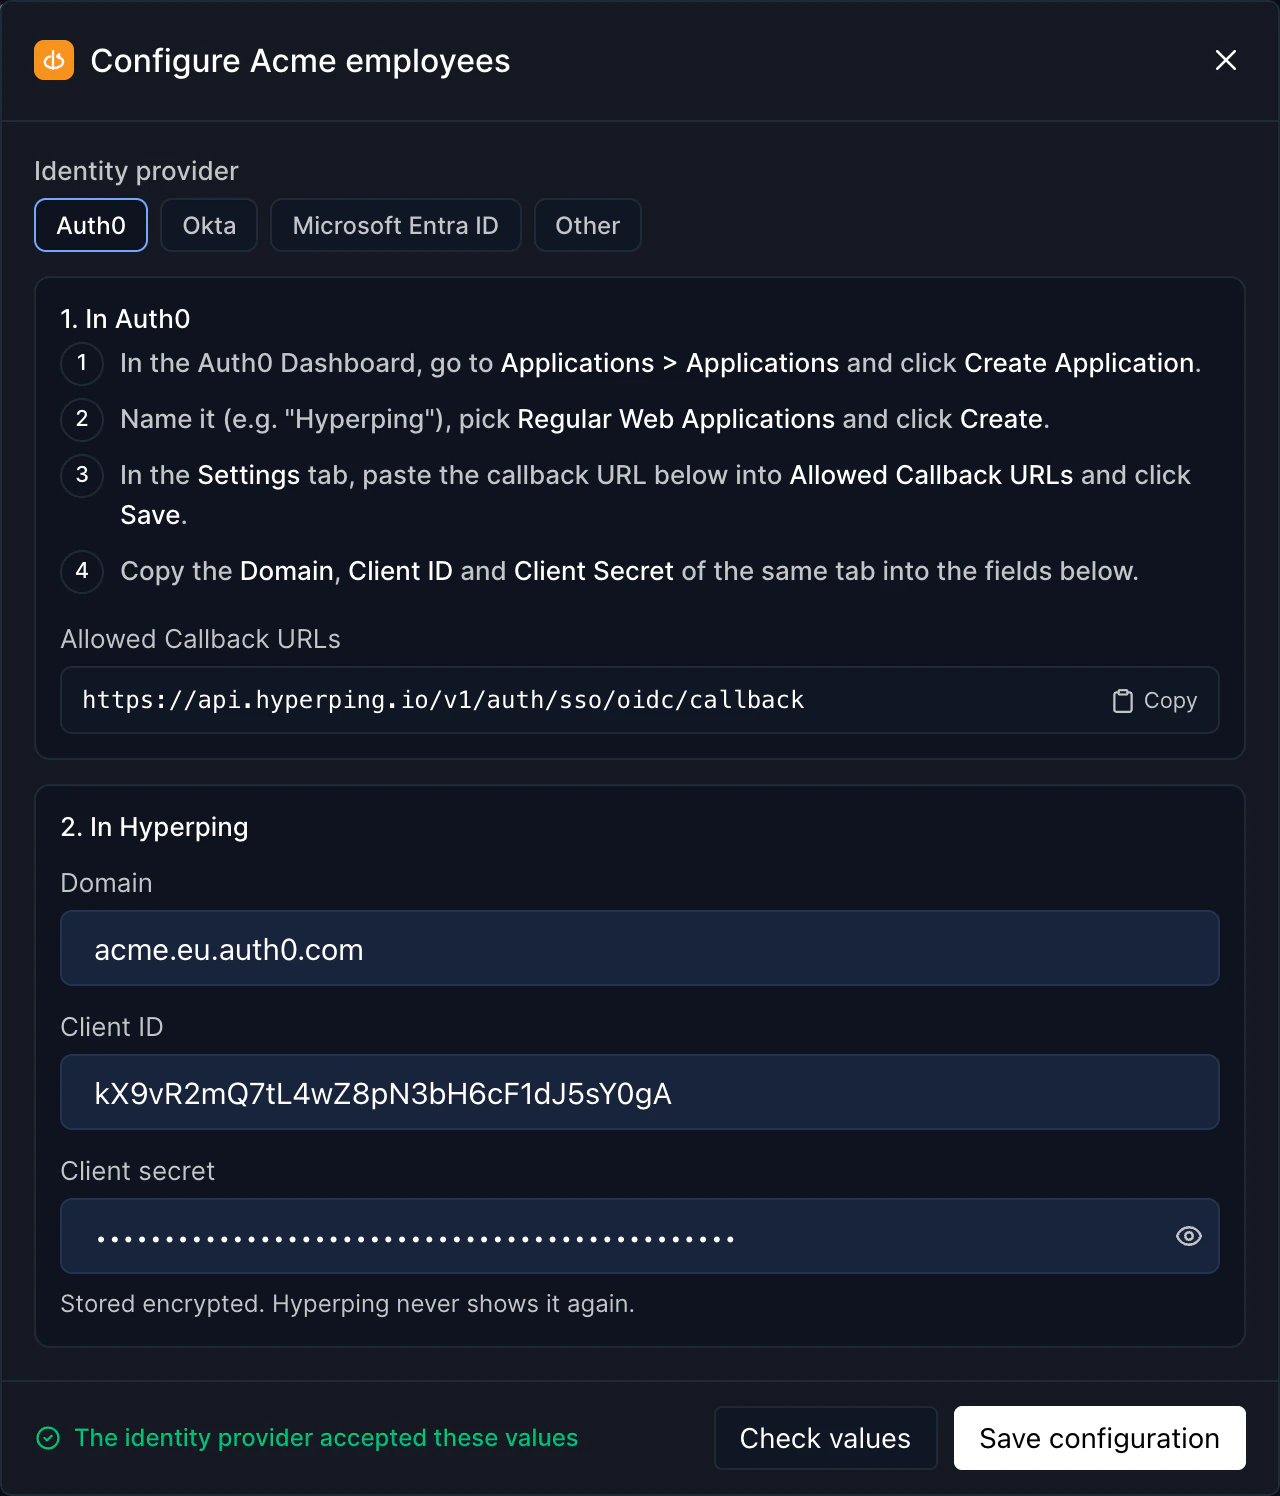
An OpenID Connect connection for Auth0, with the values checked - Test the sign-in
Click Test sign-in in the dialog, or Test connection on the card, and sign in in the popup. The test checks the code exchange, the token signature, the issuer, the audience and the email, and shows the address your provider sent.
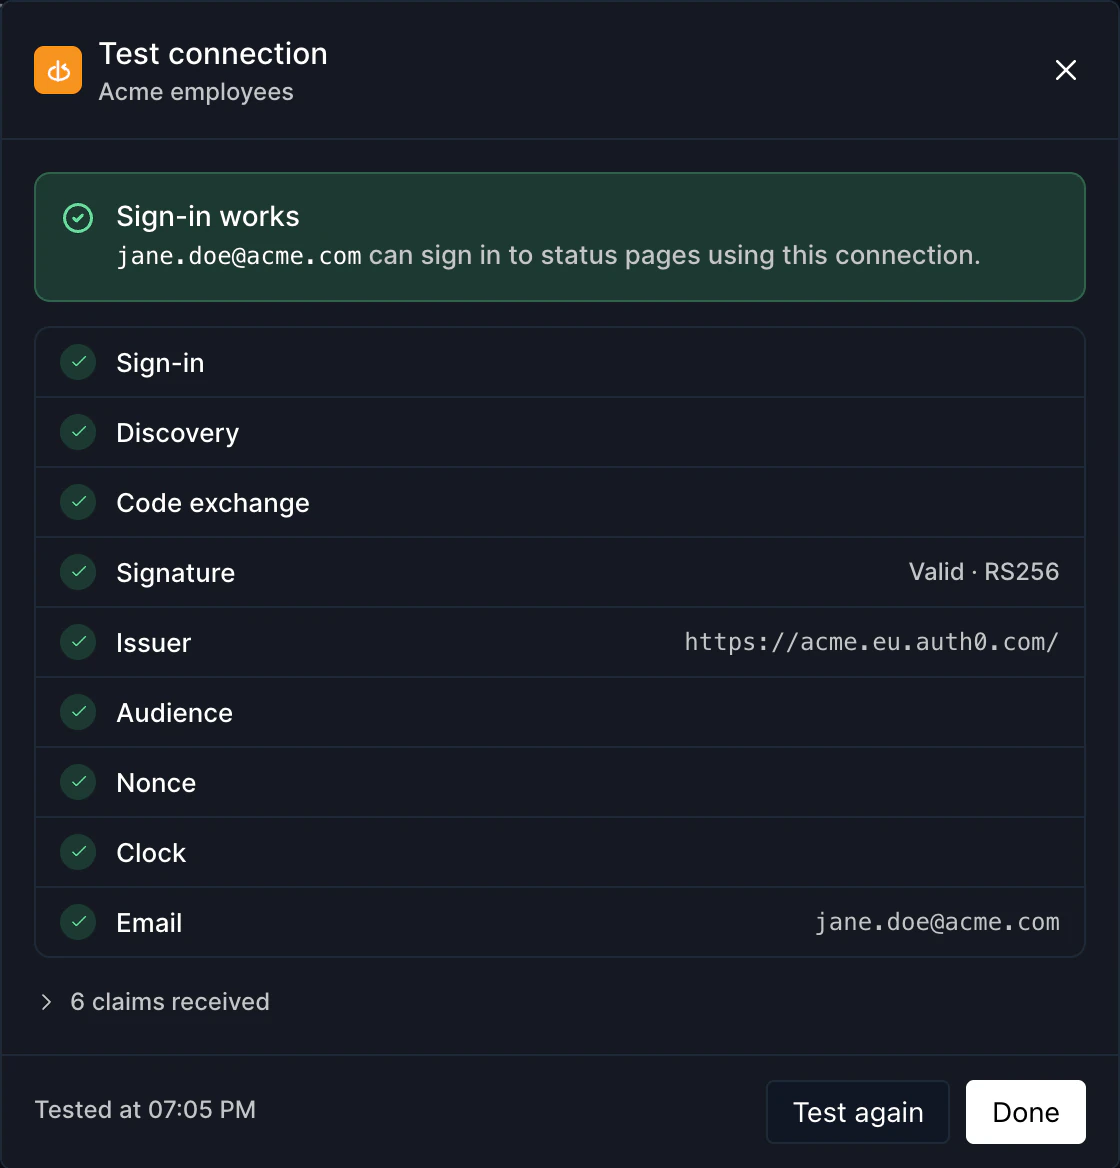
A passing test on an OpenID Connect connection
Unlike SAML, the callback URL is the same for dashboard and status page sign-in, so an application you already use for dashboard OpenID Connect sign-in also works here. Create a separate application when the status page has a different audience.
Step 2d: Configure an Other providers connection
For JumpCloud, OneLogin, Ping Identity and other SAML providers, the IdP-side configuration happens in a hosted setup portal rather than in Hyperping.
- Fill in the organization details
Click Configure on the connection card. Enter your Organization name and the Allowed domains as a comma-separated list, for example
company.com, corp.company.com. - Run the guided setup
Click Continue to setup. The portal walks through your specific provider: which app to create, which values to paste, and a check of the connection at the end. Reopen it any time from the card, with Continue setup or Manage.
Step 3: Attach the connection to a status page
Go to Status PagesChoose a status pageSettingsPage Access to protect the page.
- Turn on SSO for the page
In the page's access settings, turn on the SAML SSO toggle. It covers every connection type, OpenID Connect included.
- Pick the connection
Select your connection in the SSO Connection dropdown. Only configured connections are listed, and a warning appears when the selected one has not passed a test yet.
Repeat this on every status page the connection should protect.
How visitors sign in
On the protected status page, visitors click Sign in with SAML SSO and enter their email, and Hyperping sends them to your identity provider. The button keeps this label for OpenID Connect connections too. After a successful sign-in, they get a viewer session and land back on the page.
Your identity provider decides who gets in: anyone it signs in for the application can view the page. When a connection has allowed domains, the visitor's email must also be at one of them. No Hyperping account is created, and visitors never appear in your Teammates list.
Troubleshooting
The page says "This connection is not configured yet"
The connection was created but never completed. Open Status Pages → SSO Connections, finish the configuration, then test it from the card.
A visitor signs in but is denied access
Their email domain is not in the connection's allowed domains. Add the domain on the connection, or check that the visitor used their work account at the IdP.
People outside the company can view the page
Your identity provider let them sign in to the application. Restrict the application's assignments, or in Auth0 its Connections tab, where Google social login is often enabled by default.
I can't delete a connection
A connection that still protects status pages cannot be deleted. Remove SSO from those pages first, then delete the connection.
Do I need SSO for a simple internal page?
Maybe not. Private status pages also support password protection, email access codes, and Google sign-in, with no per-connection fee.