Set up SSO with Auth0
Sign in to the Hyperping dashboard, and to your private status pages, with Auth0. Hyperping connects to Auth0 over OpenID Connect, so you do not need a SAML add-on in Auth0. The setup takes about ten minutes.
Prerequisites
- For dashboard sign-in, a Hyperping Pro or Business plan and the Owner or Admin role.
- For private status pages, a Business plan. Each SSO connection is billed $49 per month, and one connection can protect several status pages.
- Admin access to your Auth0 tenant.
Hyperping value used during setup
| Auth0 field | Value |
|---|---|
| Allowed Callback URLs | https://api.hyperping.io/v1/auth/sso/oidc/callback |
The same URL works for dashboard sign-in, status page connections and test sign-ins, so one Auth0 application can serve both uses. Create two applications if the dashboard and the status page have different audiences. The Hyperping setup dialog shows the URL with a copy button.
Step 1: Create the application in Auth0
- Create a Regular Web Application
In the Auth0 Dashboard, go to Applications → Applications and click Create Application. Name it "Hyperping", pick Regular Web Applications and click Create. You can skip the quickstart Auth0 shows next.
- Add the callback URL
In the Settings tab, paste the callback URL into Allowed Callback URLs and click Save Changes at the bottom of the page. The other URL fields can stay empty.
- Choose who can sign in
Open the Connections tab. Auth0 usually enables your tenant's existing connections on a new application, often including the Username-Password-Authentication database and google-oauth2 social login. Keep only the connections your users sign in with, such as your company directory.
Step 2: Copy the values into Hyperping
The application's Settings tab shows the three values Hyperping needs: Domain, Client ID and Client Secret. Paste the domain as it appears, for example acme.eu.auth0.com. If your tenant signs users in on a custom domain such as login.acme.com, you can paste that one instead.
For dashboard sign-in
Go to MembersAuthentication and click Configure on the OpenID Connect card.
- Paste the Auth0 values
Keep the Auth0 tab selected, then fill in Domain, Client ID and Client secret.
- List your email domains
In Email domains, enter the domains of your team, for example
acme.com. People who sign in with these domains are sent to Auth0. - Check and save
Click Check values, then Save configuration.
For a private status page
Go to Status PagesSSO Connections to create the connection.
- Create an OpenID Connect connection
Click New connection, select OpenID Connect, name the connection and click Create connection.
- Paste the Auth0 values
Click Configure on the new connection card, then fill in Domain, Client ID and Client secret. Click Check values, then Save configuration.
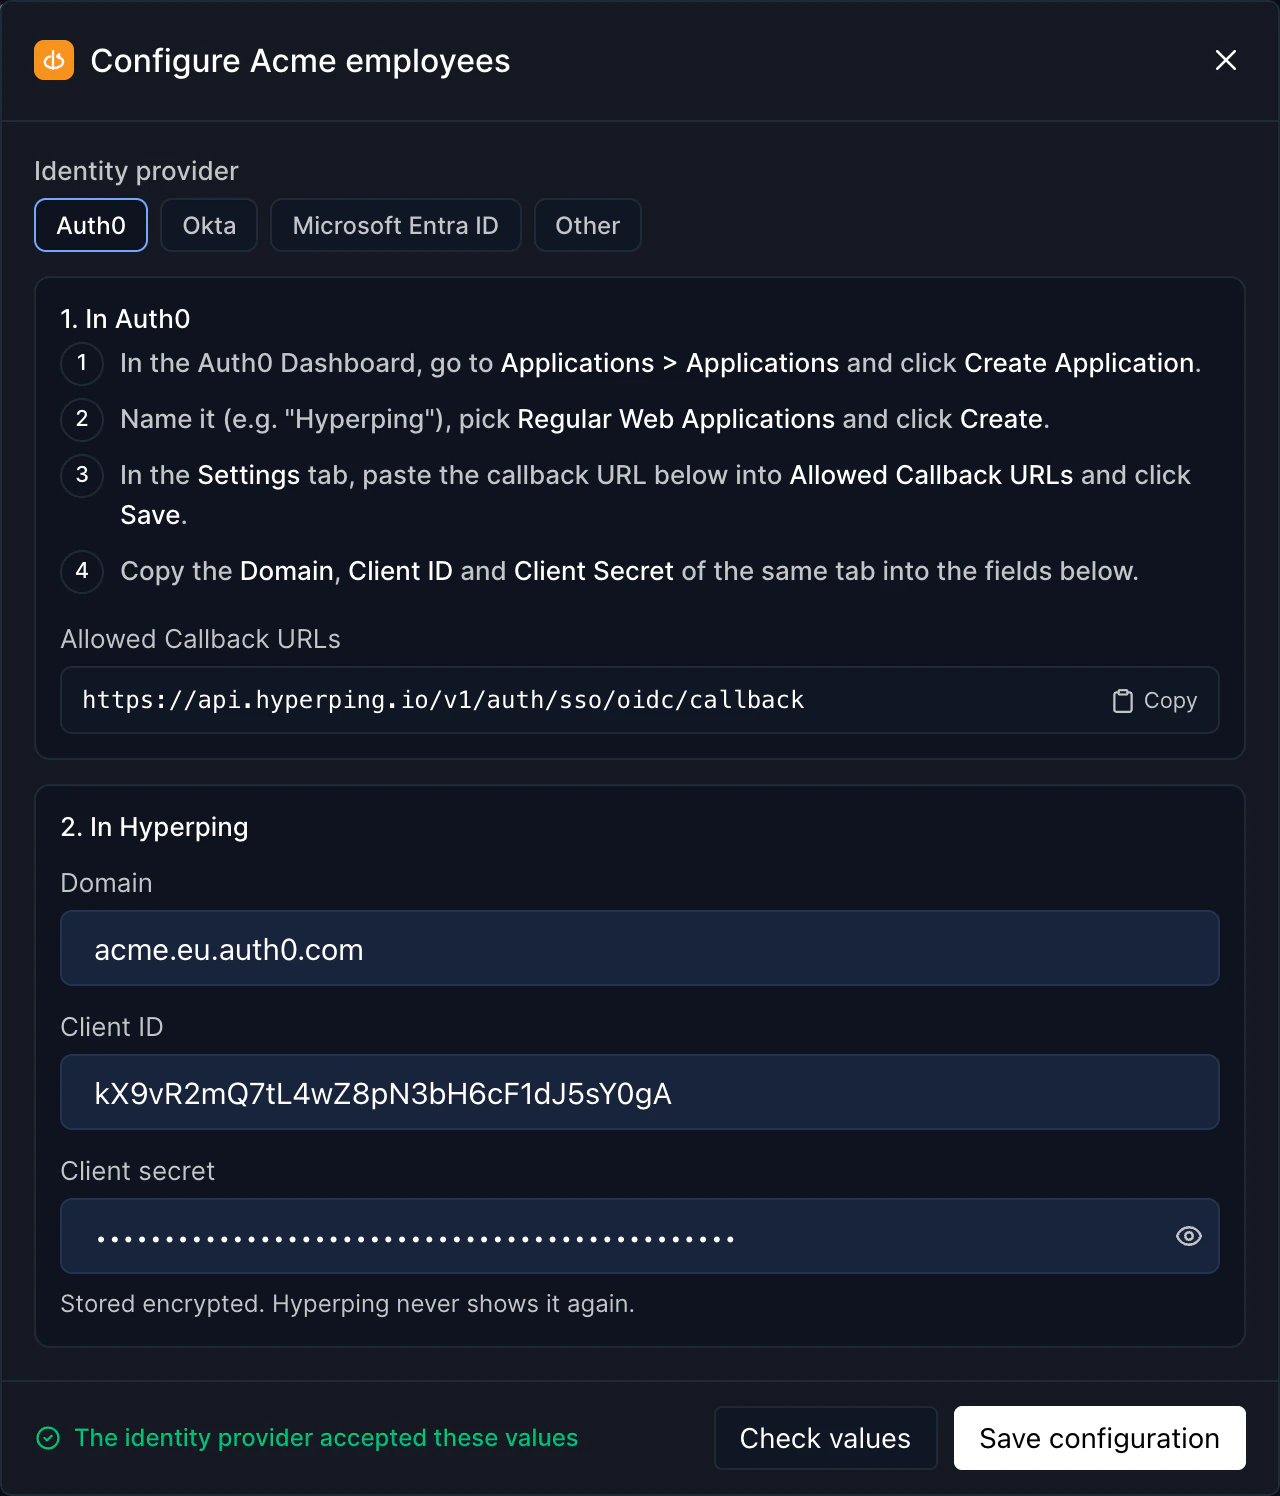
An OpenID Connect status page connection, set up for Auth0 - Attach it to the status page
In the status page's Settings → Page Access, turn on SAML SSO and pick the connection under SSO Connection. The toggle covers OpenID Connect connections too.
Step 3: Test the sign-in
After saving, click Test sign-in in the dialog. On a status page connection card, the same test is called Test connection. Sign in with an Auth0 user in the popup. The test checks the code exchange, the token signature and the email Auth0 sends, and signs nobody in.
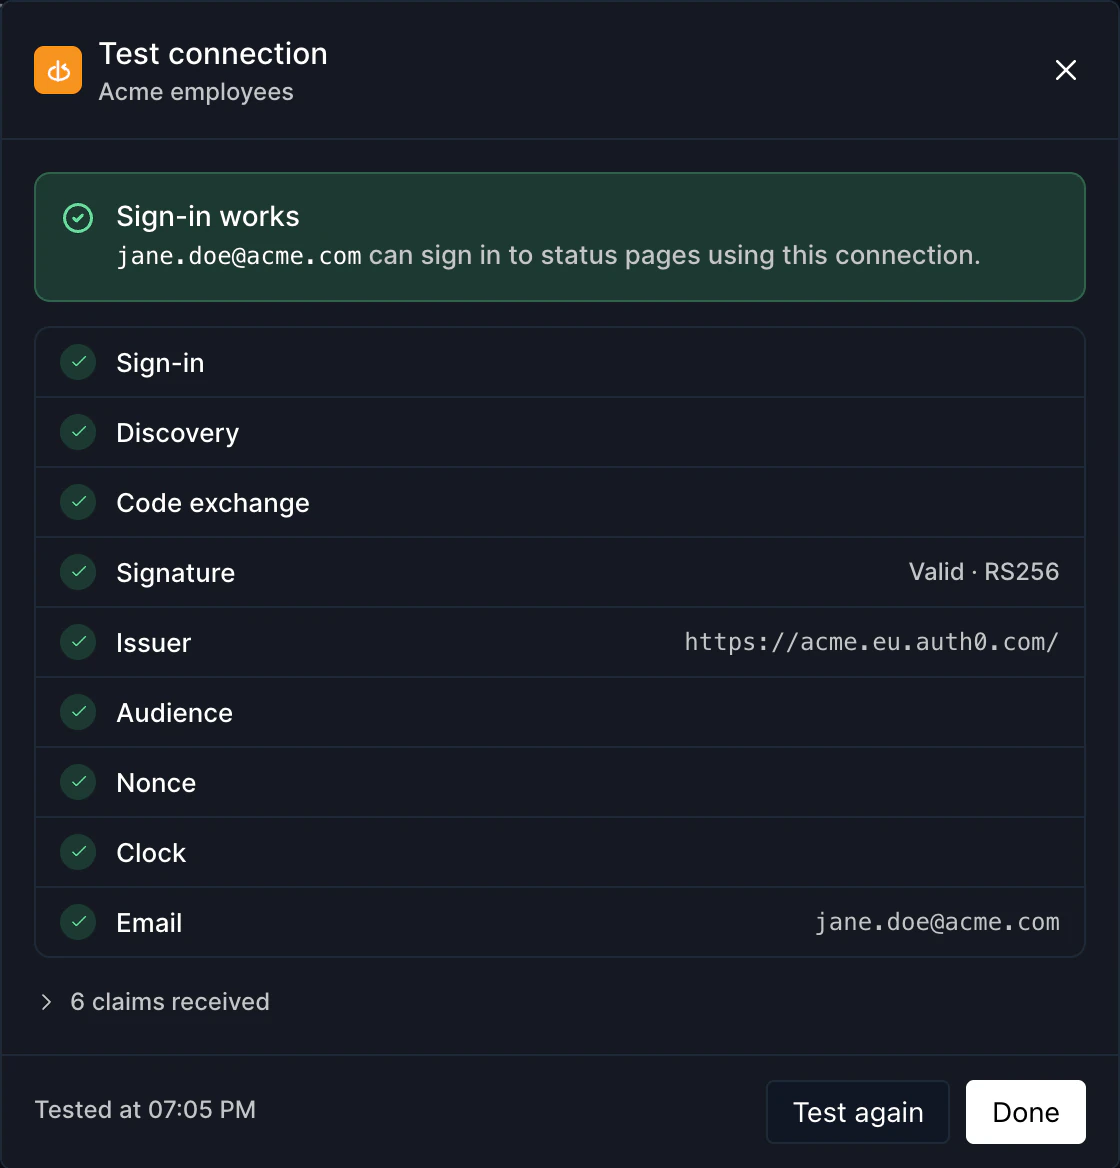
Auth0 settings Hyperping relies on
The defaults of a new Regular Web Application work as they are. If someone changed them, check these:
| Setting | Where in Auth0 | Expected value |
|---|---|---|
| Application type | Settings → Application Properties | Regular Web Application. Single Page and Native applications have no client secret. |
| Grant types | Settings → Advanced Settings → Grant Types | Authorization Code enabled. |
| Token signature | Settings → Advanced Settings → OAuth | RS256, the default. HS256 also works. |
| Authentication method | Credentials | Client Secret (Post), the default. |
| Connections | Connections | Only the connections whose users should sign in. |
Troubleshooting
Auth0 shows "Callback URL mismatch"
The callback URL is missing from Allowed Callback URLs, or has a typo. Copy it again from the Hyperping dialog, paste it, and click Save Changes.
"The identity provider refused this client ID and secret"
Copy the Client ID and Client Secret again from the same application. If you rotated the secret in Auth0, paste the new one in Hyperping. Also check that the Credentials tab still uses Client Secret (Post).
Sign-in fails with "Your identity provider has not verified this email address"
The person signed in with an Auth0 database account whose email is not verified yet. Ask them to open the verification email from Auth0, or send it again from User Management → Users.
Someone outside the company could open the status page
On the application's Connections tab, turn off the connection they used, usually google-oauth2 or the database. To keep a connection but let in only some of its users, add a post-login Action that denies access to this application for the others.
"The application is not allowed to use the authorization code grant"
Turn Authorization Code back on under Advanced Settings → Grant Types and save.