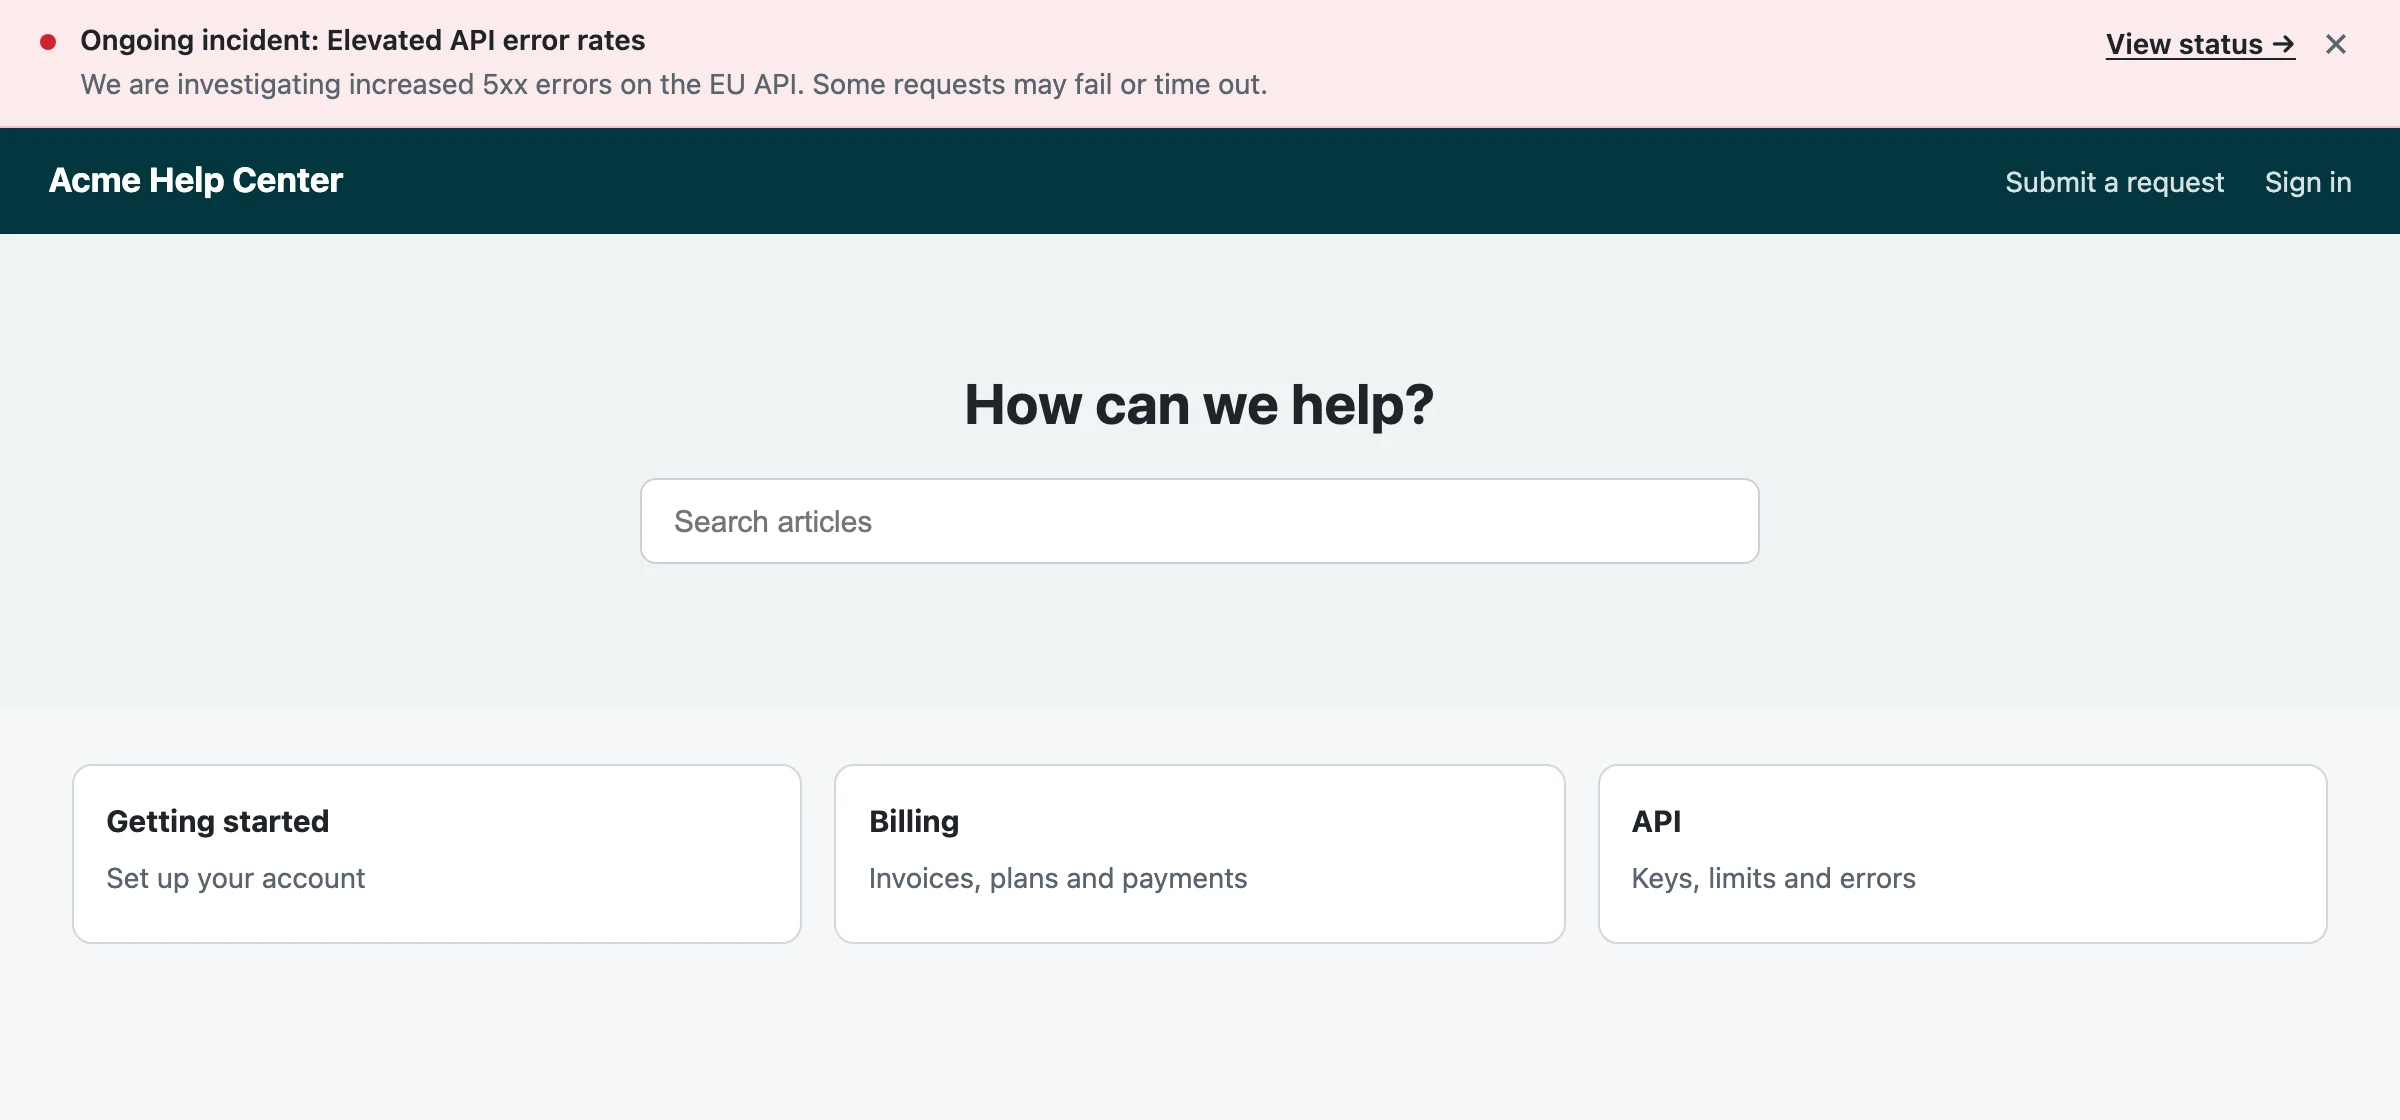
Your customers rarely learn about an incident from your status page. They learn about it on the site they are using: the login that fails, the dashboard that hangs, the pricing page that won't load, or the help center they open to look up an error. The new status banner integration shows your Hyperping status on those pages, at the top, for as long as an incident or maintenance is going on. When everything is fine, it is not there.
Key takeaways
- The status banner is a script tag you paste on any site: web app, marketing site, docs, or a help center on Zendesk Guide, Intercom or HelpScout.
- It follows one Hyperping status page and appears during incidents, outages, maintenance in progress, and in the 24 hours before a scheduled maintenance.
- It shows nothing when all systems are operational, unless you turn on the green "All systems operational" state.
- It has no dependency, sets no cookies, and renders in a Shadow DOM, so your site's CSS and the banner's styles never mix.
- Available on paid plans, under Integrations in the dashboard.
Put the status where customers already are
During an incident, a customer who hits an error can look for your status page or ask you. When they ask, it is a ticket or a chat message saying "is it down?", and your support team answers the same question again and again while engineers work on the fix.
The banner answers it on the page where the customer noticed the problem. They read that you know about it, what the latest update says, and where to follow it, without writing to support. Once the incident is resolved, the banner goes away on its own.
From Zendesk to any website
The banner started as the Help Center part of our Zendesk integration: a script that showed ongoing incidents at the top of Zendesk Guide. Looking at it again, nothing in it depended on Zendesk. It is a plain script that reads the status of a page and draws a banner, so it works anywhere you can add a script tag.
So it is now an integration of its own, separate from Zendesk. You can use it on your web app, your login page, your marketing site built with Webflow, WordPress or Framer, a Next.js app, your docs, and help centers on Zendesk Guide, Intercom or HelpScout. If your customers talk to you through the Intercom messenger, the Intercom integration shows the same status inside the messenger.
Every state the banner shows
The banner follows one status page and shows a state when there is something to say:
- An ongoing incident, in red, with the incident title.
- An outage, when monitors on the page are down, in red with a "Service disruption" label.
- A maintenance in progress, in blue.
- A scheduled maintenance, in blue, starting 24 hours before it begins.
- "All systems operational", in green, only if you turn it on.
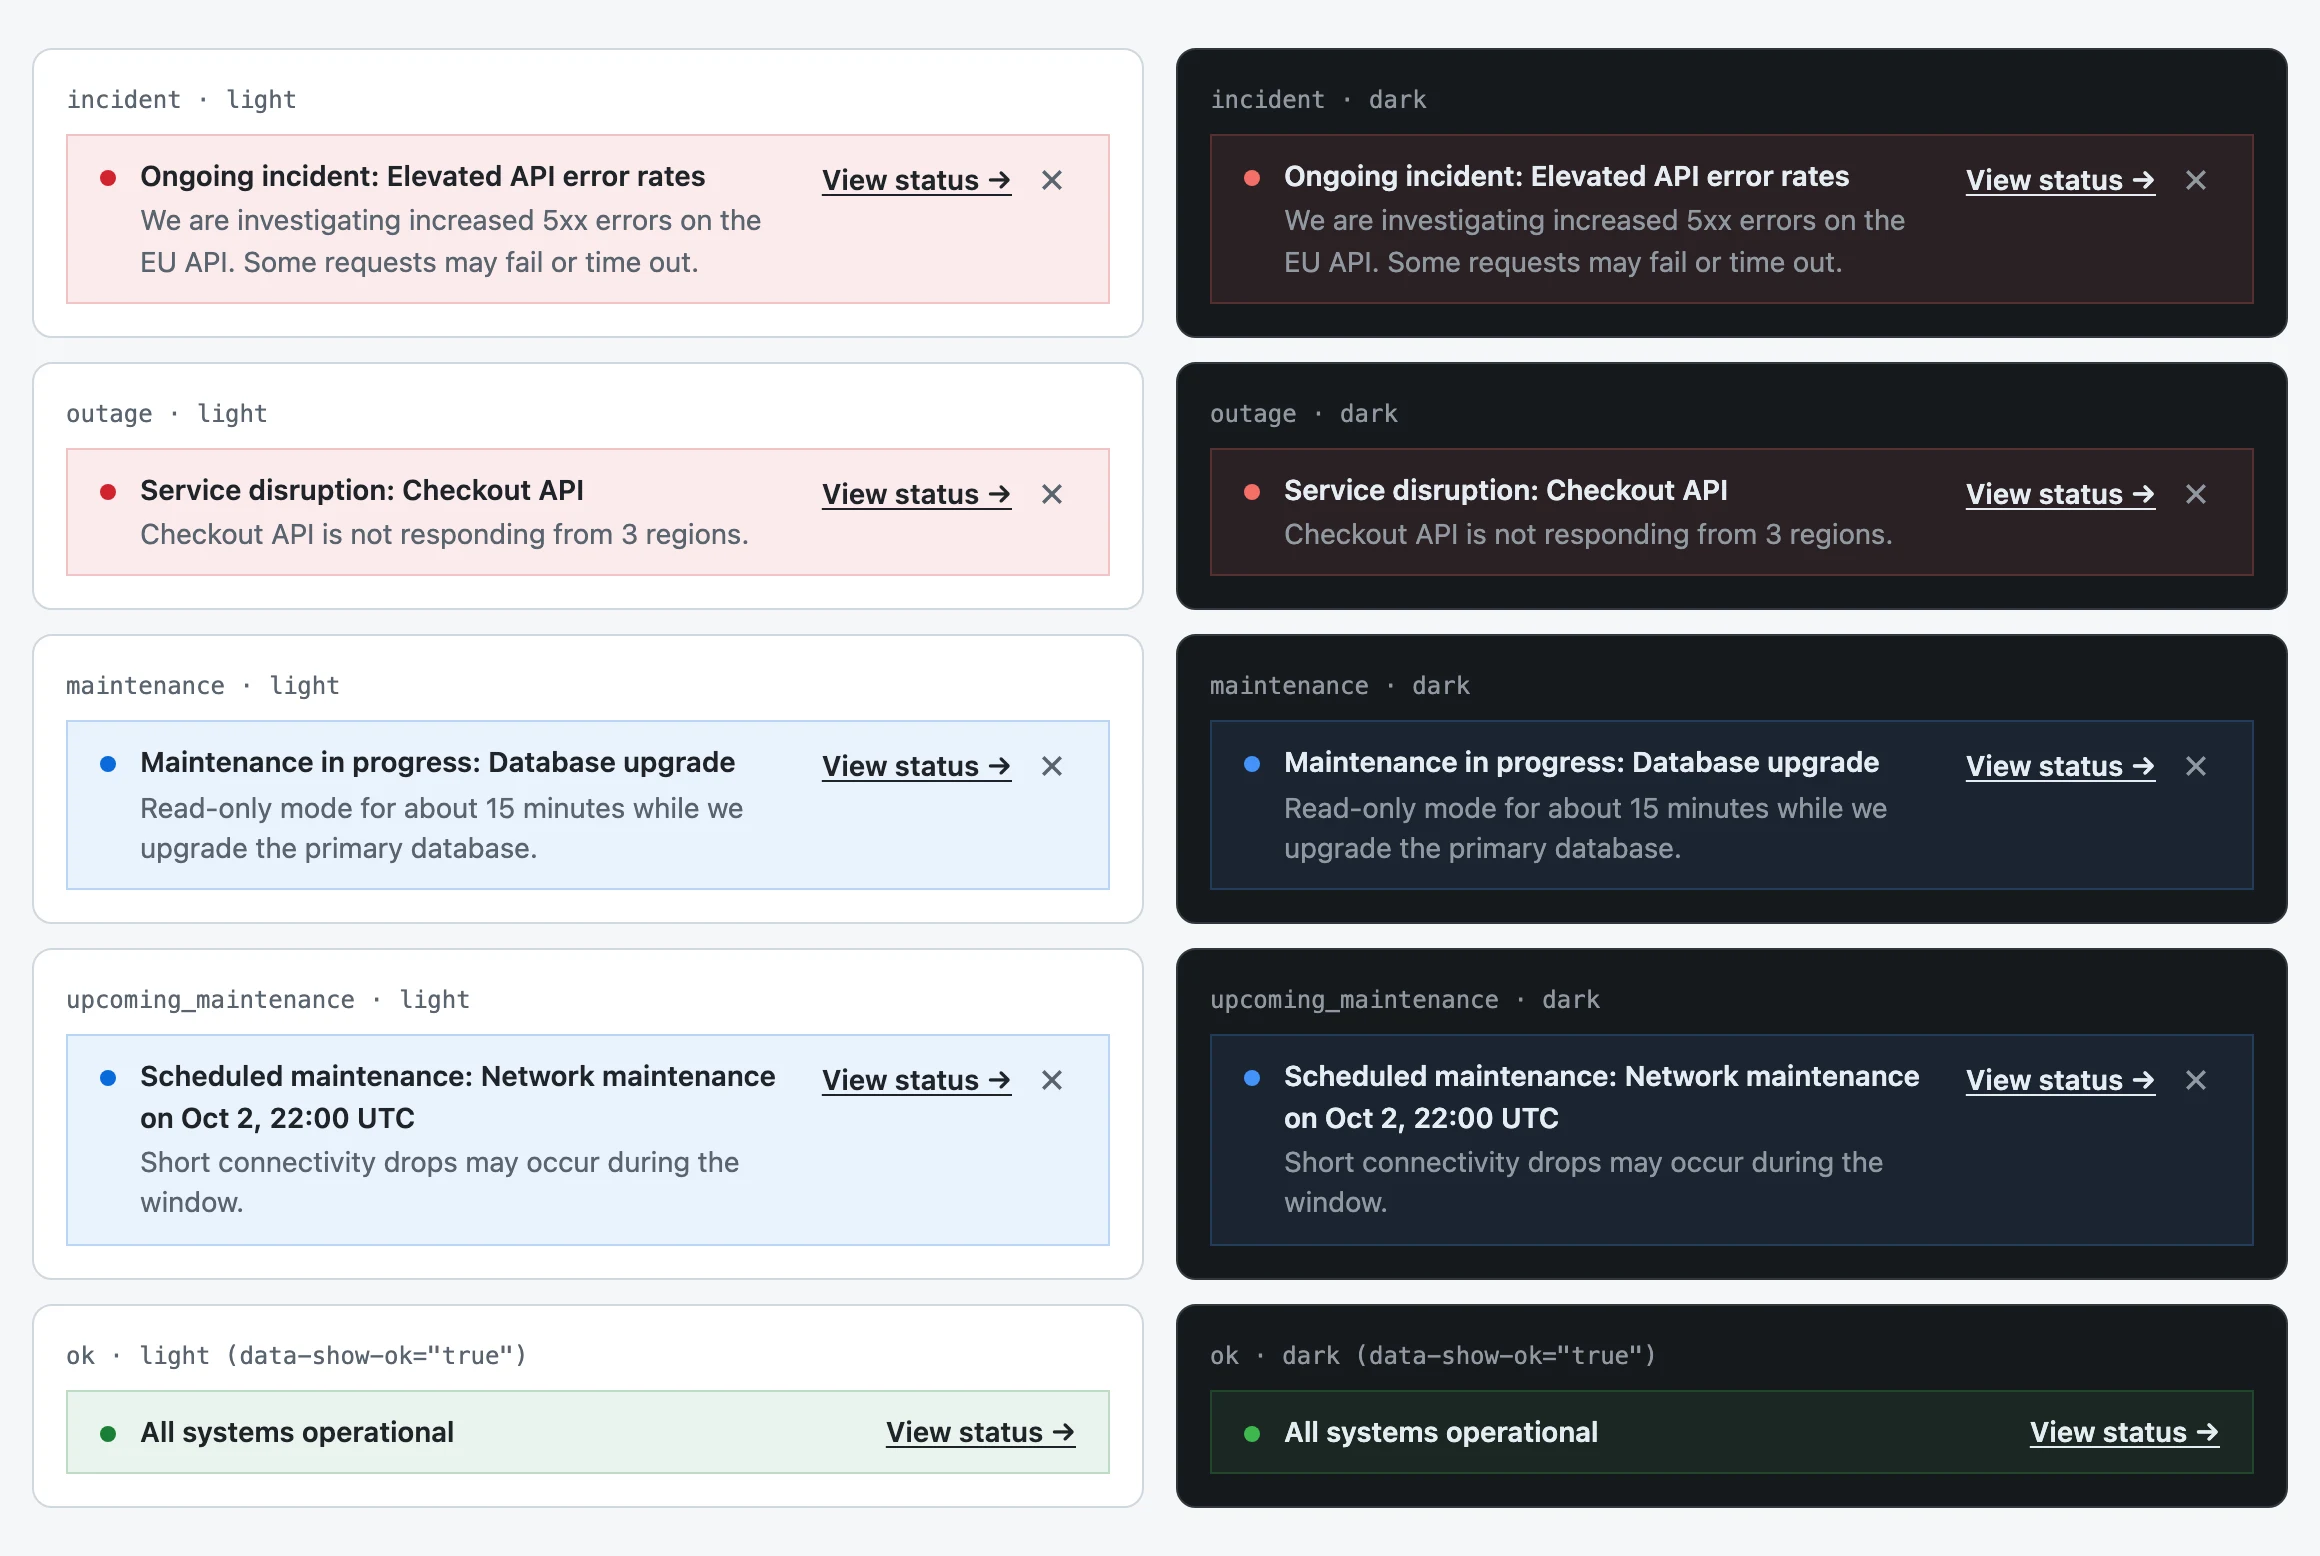
Each banner shows the state and the title, the latest update on up to two lines, and a View status link. On v2 status pages, that link opens the incident's own page. Visitors can close the banner with its close button. It stays closed for the rest of their browser session and comes back if the incident changes.
The banner checks the status every minute, so a new incident or update reaches your site without anyone reloading. Its labels follow the lang attribute of your page and are available in English, French, German, Spanish and Dutch.
Add the banner to your site
You need a Hyperping status page. If you don't have one yet, see how to create a status page.
1. Create the status banner integration
In the dashboard, open Integrations and pick Status banner in the Status page section. Give it a name, choose the status page it follows, and click Create. Each integration follows one status page, so if you run several pages, create one banner per page.
2. Choose how it looks
The integration page opens on Choose how it looks:
- Placement: Top of the page, or Inside an element with a CSS selector (
#hyperping-statusby default), if you want the banner in a specific spot such as under your navigation. - Theme: Light, Dark, or Follow the visitor to match their system setting.
- A toggle to also show "All systems operational" when nothing is going on.
The live preview has Incident, Maintenance and Operational tabs, so you can see each state with sample content before it goes on your site.
3. Paste the snippet on your site
Click Copy snippet and paste it in the <head> of your site, or just before </body>:
<script src="https://api.hyperping.io/v1/status-banner.js?key=int_XXXXXXXX" async></script>On a help center or a site builder, paste it where the tool accepts custom code or header scripts. The choices from step 2 are written into the snippet as attributes, so the copied tag already carries them. You can also edit them by hand:
| Attribute | Effect |
|---|---|
data-target="#el" |
Shows the banner inside the element matching the selector instead of at the top of the page |
data-theme="dark" or "auto" |
Uses the dark theme, or follows the visitor's system setting |
data-show-ok="true" |
Also shows "All systems operational" when nothing is going on |
4. Check it is live
The third block of the integration page, Check it is live, lists the sites the banner was loaded from, with when each one last loaded it. If your site shows up there, the banner is installed and will appear at the next incident or maintenance.
Light on your site
The script has no dependency and sets no cookies. It loads with async, so the rest of your page doesn't wait for it, and it shows nothing when there is nothing to report.
It renders inside a Shadow DOM. Your site's CSS cannot change how the banner looks, and the banner's styles cannot change your site. You pick the theme and the placement, and it looks the same on every site you paste it on.
If you want to build your own component instead, the status the banner reads is public JSON at /v1/status-banner/<key> on the Hyperping API. Read it from your own code and render the status however you like.
The banner stays hidden when the status page it follows is protected, so a private status page never shows its incidents on a public site.
Get started
The status banner is available on paid plans. Open Integrations in the dashboard and pick Status banner in the Status page section. The status banner docs cover every option and each help center in detail. To make the most of it, publish status page incidents with an update customers can act on, and schedule your maintenance windows in Hyperping so the banner can announce them a day ahead.
Questions? Reach out via in-app chat or email us at hello@hyperping.io.
FAQ
Does the Hyperping status banner slow down my website? ▼
The script loads with the async attribute, so it does not hold up the rest of your page. It has no dependencies, sets no cookies, and checks the status once a minute. When nothing is going on, it shows nothing.
Does the status banner work with Zendesk, Intercom or Webflow? ▼
Yes. The banner is a single script tag, so it works on any site where you can add custom HTML: Zendesk Guide, Intercom, HelpScout, Webflow, WordPress, Framer, a Next.js app, a marketing site or your docs. It renders inside a Shadow DOM, so your site's CSS cannot break it and its styles do not leak into your page.
What does the status banner show when all systems are operational? ▼
Nothing, by default. The banner appears only during an incident, an outage, a maintenance in progress, or in the 24 hours before a scheduled maintenance. If you want a green All systems operational banner the rest of the time, turn on the toggle before copying the snippet, or add data-show-ok="true" to the script tag yourself.
Can I change the look of the status banner or use dark mode? ▼
You can pick a light or dark theme, or let the banner follow the visitor's system setting, and place it at the top of the page or inside an element of your choice. Its styles are isolated in a Shadow DOM, so your own CSS does not apply to it. For a fully custom design, read the public JSON endpoint /v1/status-banner/<key> and build your own component.
Does the status banner work with a private status page? ▼
No. When the status page the banner follows is protected, the banner stays hidden, so it never shows that page's incidents on a public site. It works with public status pages.