I bet every support team lead has had that moment — a critical incident spiraling out of control because nobody knew exactly when or how to escalate it. Been there, done that.
But here's the thing — most organizations treat escalation policies as an afterthought, usually cobbling together makeshift procedures only after a major incident has already caused havoc.
There's nothing wrong with learning from experience, of course.
It's just not the best approach.
So what's better? Building a well-thought-out escalation policy before you actually need one, ensuring every team member knows exactly what to do when things go sideways. For a broader understanding of handling such situations, explore our guide on incident management best practices.
Or to put it another way, creating a proactive escalation framework that actually works.
And that's what this guide is about.
You'll learn how to design an effective escalation policy from the ground up, including clear triggers, communication protocols, and best practices that will keep your incident management running smoothly.
If you're looking for more perspectives, Zendesk also offers a good overview of escalation management.
It's a lot to cover, so let's dive right in.

TL;DR
- Organizations with well-defined escalation policies resolve incidents 40% faster because every team member knows exactly when and how to escalate issues.
- Effective escalation requires three core components: clear severity-based triggers, tiered support structure with defined authority levels, and automated notification routing to prevent human error.
- The key to success is proactive design — build your escalation framework during calm periods, not during active incidents when emotions run high and decisions get clouded.
Define clear triggers and criteria
Let's be honest without clear triggers and criteria, your escalation policy is like a car without a steering wheel. You might move forward, but you won't know where you're going.
Think about it. When should your team escalate an issue? "When it's serious" isn't specific enough. You need concrete, actionable criteria that leave no room for confusion.
Here's how to establish effective escalation triggers:
Severity levels
Your first step is to define clear severity levels. In my experience, a three-tier system works best:
| Severity | Definition | Examples | Escalation timeframe |
|---|---|---|---|
| SEV1 (Critical) | Complete system outage, security breach, or issues affecting >50% of users | Payment system down, data breach, complete site outage | Immediate |
| SEV2 (High) | Major feature unavailability, performance degradation affecting multiple users | Login issues, 50% performance drop, key feature broken | Within 15 minutes |
| SEV3 (Medium) | Minor bugs, isolated issues, or non-critical feature requests | UI glitches, single user issues, cosmetic problems | Within 2 hours |
Each severity level should have its own escalation path and timeframes. For instance, a SEV1 incident might require immediate escalation to senior engineers, while a SEV3 issue can follow standard support channels.
Time-based triggers
Time is often your most reliable indicator for escalation.
Here's a practical framework:
- Unacknowledged tickets: Escalate after 15 minutes for SEV1, 30 minutes for SEV2
- Unresolved issues: Escalate if no progress after 1 hour for SEV1, 4 hours for SEV2
- SLA breaches: Automatic escalation when approaching 80% of agreed response time. Understanding your SLAs, SLOs, and SLIs is fundamental here.
Impact thresholds
Consider quantifiable impact measures:
- Number of affected users (e.g., >1000 users trigger immediate escalation)
- Revenue impact (e.g., issues affecting payment processing)
- System performance degradation (e.g., >20% slowdown in response time)
TIP: Having clear maintenance windows and plans is crucial for preventing unnecessary escalations (learn more about setting up effective website maintenance plans).
Customer-driven escalations
Sometimes, your customers will tell you when to escalate. Define clear criteria for these situations:
- VIP customer requests
- Explicit escalation requests from customers
- Multiple contacts about the same issue
- Threats of contract cancellation or legal action
Here's a real-world example to illustrate this: At one company I worked with, they initially had vague escalation criteria like "escalate when necessary." This led to confusion and delayed responses. After implementing specific triggers (like "escalate after 2 hours of no resolution for payment system issues"), their average resolution time dropped by 45%.
Remember: Your triggers should be specific enough to act on but flexible enough to accommodate unique situations. Think of them as guardrails rather than absolute rules.
The key is to document these triggers clearly and ensure everyone on your team understands them. This prevents the all-too-common scenario where different team members have different interpretations of what constitutes an escalation-worthy situation.
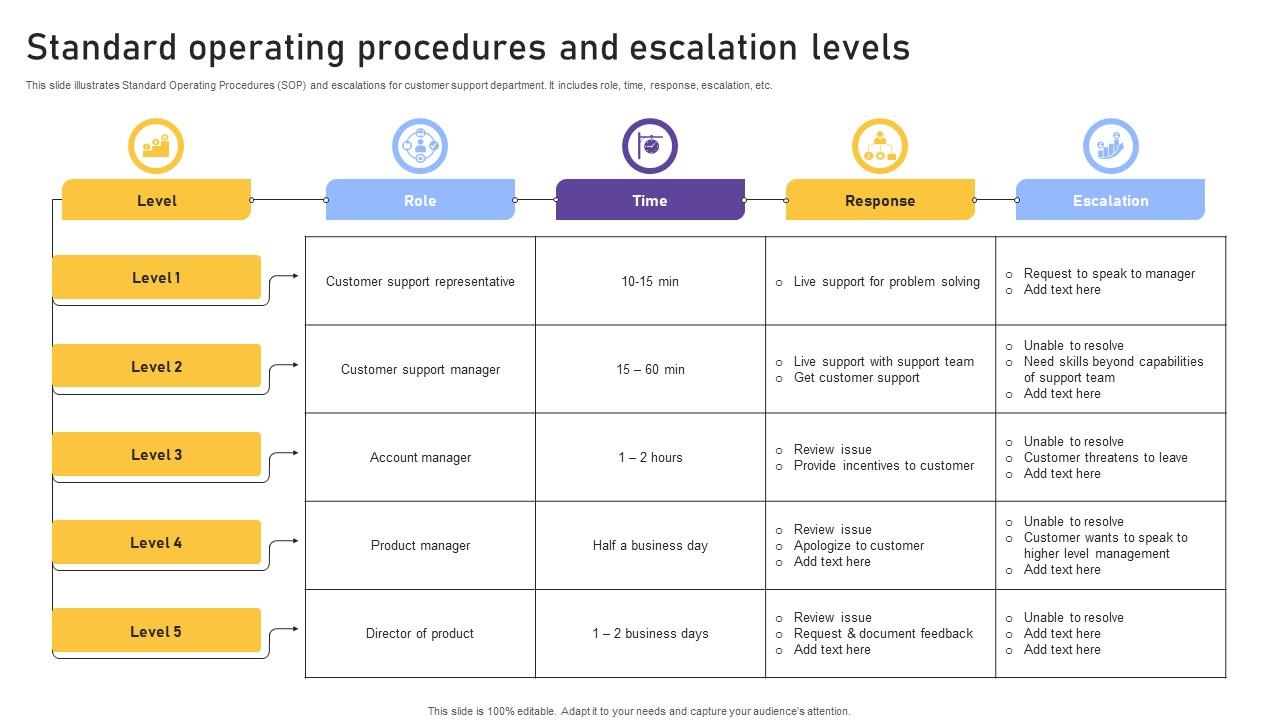
Create a tiered support structure
Let's talk about something that's absolutely fundamental to any escalation policy: the tiered support structure.
Think of it as your incident management hierarchy, where each level represents increasing expertise and authority to handle more complex issues.
Here's how a typical four-tier support structure works:
| Level | Role | Responsibility | Authority |
|---|---|---|---|
| L1: Front-line support | First responders | Handle initial customer contact, basic troubleshooting, resolve common documented issues | Can restart services, follow standard procedures |
| L2: Technical specialists | Subject matter experts | Complex technical issues, deeper product knowledge, most system-related problems | Can modify configurations, escalate to vendors |
| L3: Expert engineers | Senior technical staff | Complex system issues, bugs, architecture problems, technical guidance | Can approve emergency changes, coordinate with dev teams |
| L4: Management/External | Executives, vendors | Critical business decisions, third-party escalations, high-impact incidents | Can authorize resources, make policy exceptions |
But here's what makes this structure truly effective:
Each tier must have clear boundaries of responsibility. Without them, you risk creating what I call "escalation chaos" where issues bounce between levels without clear ownership.
Let me share a quick example of why this matters:
Let's say a company has a vague distinction between L2 and L3 support. The result? L2 engineers constantly second-guess whether they should escalate issues, while L3 engineers got frustrated with "unnecessary" escalations. This led to delayed resolutions and frustrated customers.
After clearly defining each tier's responsibilities and authority levels, escalation decisions become more straightforward, and resolution times improved dramatically.
The goal isn't to create rigid barriers between levels but to establish clear pathways for issue resolution. Each tier should know exactly when to handle an issue themselves and when to elevate it to the next level.
Establish clear roles and responsibilities
Getting your escalation policy right isn't just about having different support tiers — it's about knowing exactly who does what at each level.
Let's break this down into actionable components that make your escalation process run smoothly.
Key responsibilities by role
| Role | Primary responsibilities | Decision authority | Communication duties |
|---|---|---|---|
| Incident owners | Take initial ownership, document steps, determine severity, track progress | Can restart services, follow emergency procedures | Manage customer communication, update stakeholders |
| Escalation managers | Review escalation requests, ensure proper handoffs, monitor SLA compliance | Approve resource allocation, coordinate cross-team efforts | Bridge communication between teams and management |
| Technical leads | Provide expert analysis, guide junior staff, approve solutions, interface with dev teams | Emergency changes, technical architecture decisions | Document lessons learned, mentor team members |
| Executive stakeholders | Critical business decisions, resource authorization, client communication during major incidents | Policy exceptions, budget approvals, vendor negotiations | Executive briefings, public communications |
Here's what makes this structure work in practice:
Each role needs specific decision-making authority levels.
For example, a Level 2 engineer needs management approval for every system restart, even during off-hours. This leads to unnecessary delays and frustrated customers. After explicitly defining authority levels, including what actions could be taken without approval, resolution times dropped by 40%.
Authority levels matrix
| Action type | L1 Support | L2 Technical | L3 Expert | L4 Management |
|---|---|---|---|---|
| Service restart | ✅ Standard services | ✅ All services | ✅ All systems | ✅ Emergency authorization |
| Configuration changes | ❌ Not authorized | ✅ Minor changes | ✅ Major changes | ✅ Policy overrides |
| Emergency procedures | ✅ Follow runbooks | ✅ Modify procedures | ✅ Create new procedures | ✅ Authorize exceptions |
| Customer communication | ✅ Standard updates | ✅ Technical explanations | ✅ Complex incidents | ✅ Executive escalations |
| Vendor escalation | ❌ Not authorized | ✅ Technical issues | ✅ Complex problems | ✅ Contract issues |
Roles and responsibilities shouldn't be static documents that gather dust.
They should be living guidelines that evolve with your organization's needs and lessons learned from actual incidents.
Regular reviews and updates of these roles ensure your escalation policy remains effective as your organization grows and changes. The key is to strike a balance between having enough structure to be effective while maintaining the flexibility to handle unique situations.
Set up communication protocols
Communication can make or break your escalation process.
I've seen brilliant technical teams struggle simply because they didn't have clear protocols for sharing information during incidents.
Let's dive into how to set up effective communication channels that keep everyone in the loop.
Communication channels by urgency
| Urgency level | Primary channel | Secondary channel | Response time |
|---|---|---|---|
| Critical (SEV1) | Phone calls + SMS | Incident Slack channel | < 5 minutes |
| High (SEV2) | Slack/Teams mentions | Email notification | < 15 minutes |
| Medium (SEV3) | Ticket system | Email updates | < 2 hours |
| Low (SEV4) | Knowledge base | Next business day |
Primary communication channels
Define specific channels for different types of communication:
Urgent incidents
- Real-time chat platforms (Slack, Microsoft Teams)
- Phone calls or SMS for critical alerts
- Emergency conference bridge numbers
- Dedicated incident response channels
Regular updates
- Email for non-urgent communications
- Ticket system updates
- Status page updates (use our incident communication templates)
- Internal knowledge base entries
Stakeholder communications
- Executive briefing templates
- Customer communication formats
- Status page updates
- Post-incident reports
TIP: Internal status pages to keep team members and internal stakeholders informed (see how to create an internal status page). Check out our customer showcase to see examples of status pages in action.
Here's what makes this really work:
Let's say a team uses the same Slack channel for all incidents. The result? Critical messages got lost in the noise of routine updates. After implementing dedicated channels based on severity levels, response times improved dramatically, and team stress levels dropped noticeably.
NB: Hyperping supports chat platforms, automated voice calls, SMS, includes status pages, and more.
Documentation requirements
For each escalation, ensure these elements are captured:
- Initial incident description
- Timeline of actions taken
- All attempted solutions
- Reasons for escalation
- Current status and next steps
- Customer impact assessment
- Resources involved
Stakeholder communication matrix
| Stakeholder | SEV1 | SEV2 | SEV3 | Preferred method |
|---|---|---|---|---|
| Engineering team | Immediate Slack + SMS | Slack mention | Ticket update | Slack/Teams |
| Management | Phone call + email | Email summary | Weekly report | Phone/Email |
| Customers | Status page + direct communication | Status page update | Email if affected | Status page |
| Sales team | Immediate brief if customer-facing | Email update | No notification |
The goal isn't to create communication overhead but to ensure the right information reaches the right people at the right time. Keep your protocols simple enough to follow under pressure but comprehensive enough to maintain clarity throughout the incident lifecycle.
Regular reviews of communication effectiveness during post-incident reviews will help you refine these protocols over time, making them more efficient and useful for your team's specific needs.
Digital war-room etiquette
Nothing derails an incident faster than chat chaos. Follow these ground rules:
| Rule | Why |
|---|---|
Single source-of-truth channel (#warroom-sev1-2025-07-28) |
Prevents split conversations |
Pin the current status (use /announce every 15 min) |
Keeps late joiners aligned |
| Use emoji shorthand 👍 acknowledged, 🛠️ investigating, ✅ fixed | Reduces clutter |
| Nominate a scribe (rotates each incident) | Ensures timeline accuracy for the post-mortem |
| No side debates in main channel – move to thread or DM | Maintains signal-to-noise |
| End-of-call recap (TL;DR + next steps) | Smooth hand-offs across time zones |
Handle the human layer well, and all that automation you invested in actually sticks the landing.
Implement automation
Let's face it — manual escalations are a nightmare.
They're slow, prone to human error, and often lead to missed incidents or delayed responses. Not to mention the stress they put on your team when trying to figure out who to contact at 3 AM.
But here's the thing — most modern incident management tools come packed with automation capabilities that can transform your escalation process. For a deep dive into this topic, see our incident response automation guide.
Automation capabilities by function
| Function | Manual approach | Automated solution | Time saved |
|---|---|---|---|
| Escalation triggers | Check tickets every 15 minutes | Auto-escalate after time thresholds | 10-15 minutes per incident |
| Notification routing | Look up contact lists, send messages | Smart routing based on rules | 5-10 minutes per escalation |
| Status updates | Manual status page updates | Auto-update from monitoring | 15-20 minutes per incident |
| Documentation | Manual ticket creation and updates | Auto-generate tickets with context | 20-30 minutes per incident |
So, what exactly should you automate? Here are the key areas to focus on:
Automatic escalation triggers
Set up your system to automatically escalate incidents based on:
- Time thresholds (e.g., no response within 15 minutes)
- Severity levels (critical incidents go straight to senior engineers)
- Business hours vs. after-hours scenarios
- Customer SLA requirements
Smart notification routing
Configure your tools to:
- Send notifications to the right people based on incident type
- Use different channels for different severity levels
- Adjust notification frequency based on acknowledgment
- Follow up automatically if the first responder doesn't react
Workflow automation
Implement automated workflows that:
- Create and update incident tickets
- Generate status pages for stakeholders
- Collect and aggregate incident data
- Track response times and SLA compliance
Automation isn't about removing human judgment. It's about handling the repetitive stuff so your team can focus on actual problem-solving.
Remember though: start small. Pick one process to automate, test it thoroughly, and gradually expand. The last thing you want is to create a complex automation system that nobody understands or trusts.
AI-assisted triage and auto-escalation
Modern incident management increasingly leverages AI and machine learning to improve escalation decisions:
AI capabilities:
- Severity classification: LLMs can analyze incident descriptions and automatically assign appropriate severity levels
- Pattern recognition: AI systems can identify recurring issues and predict escalation paths based on historical data
- Smart routing: Machine learning algorithms can determine the best-qualified team member based on expertise and availability
Limitations to consider:
- AI systems require extensive training data and may misclassify novel incident types
- False positives can create alert fatigue, while false negatives can miss critical issues
- Human oversight remains essential for high-stakes incidents where context and judgment matter most
Best practice: Use AI as a decision support tool rather than fully automated escalation, especially during the initial implementation phase.
AI-generated stakeholder updates
Beyond triage, LLMs can shoulder the post-incident comms burden:
- Draft customer-facing summaries from ticket metadata (
prompt: “Write a 120-word update in plain English. Mention impact, mitigation, ETA.”). - Auto-populate post-mortem outlines: timeline table, contributing factors, open action items.
- Guardrails: always require human review, log the model + prompt for audit, and rate-limit to avoid leakage of sensitive data.
Used well, AI turns the 30-minute “what do we tell customers?” scramble into a two-minute review-and-send task.
Compare escalation tooling: Hyperping vs. the field
When readers research “best escalation tools,” they want facts, not fluff. Here’s how the major platforms line up against Hyperping on the features that matter most.
| Capability | Hyperping | PagerDuty | ServiceNow ITOM | VictorOps |
|---|---|---|---|---|
| Auto-escalation rules | ✅ UI | ✅ | ✅ (complex) | ✅ |
| Multi-channel alerts (voice/SMS/chat) | ✅ Voice, SMS, Slack, Teams | ✅ | ⚠️ Voice add-on | ✅ |
| Integrated status pages | ✅ Public + private | ⚠️ Add-on | ❌ | ❌ |
| Real-time cost of downtime calc | ✅ Out-of-box | ❌ | ❌ | ❌ |
| Price transparency | Predictable flat tiers | Usage-based | Negotiated | Tiered |
| Setup time (avg) | ≃ 15 min | 1–2 h | Days–weeks | 1 h |
Bottom line: Hyperping covers 90 % of what the others do, bakes in status pages, and keeps pricing sane. If you’re tired of bolt-on licenses just to get voice alerts, Hyperping is the lean choice.
Deployment-aware escalation hooks
Modern pipelines let code and incidents collide. Tie them together:
- Pre-deploy check – block production deploys if any SEV1/SEV2 is open.
- Rollback trigger – if an alert fires on a build within 10 min post-deploy, auto-revert.
- Chat-ops hooks –
/deploy statusshows active incidents;/deploy holdpauses the pipeline. - Error budget integration – once the monthly budget is exhausted, CI/CD flags every deploy as needs approval by SRE lead.
This hook-up prevents “ship → break → scramble” loops and reinforces a culture where reliability gates velocity instead of fighting it.
Define escalation types
Not all escalations are created equal, and treating them that way is a recipe for chaos.
Think about it: would you handle a minor UI bug the same way as a complete system outage? Of course not. That's why defining different escalation types is crucial for maintaining sanity in your incident response.
Escalation types and when to use them
| Type | When to use | Example scenario | Typical route |
|---|---|---|---|
| Hierarchical | Need higher authority or decision-making power | Budget approval for emergency resources | L1 → L2 → Manager → Director |
| Functional | Require specialized technical expertise | Database corruption requiring DBA skills | Support → Database team |
| Time-based | No response within defined timeframes | SEV1 unacknowledged for 15 minutes | Auto-escalate to next level |
| Impact-based | High user/revenue impact regardless of complexity | Payment system affecting 10,000+ users | Direct to senior engineering |
Here are the main types you need to consider:
Hierarchical escalations
- Move issues up the chain of command
- Perfect for situations requiring higher authority
- Typically follow your org chart (team lead → manager → director)
- Used when decisions need executive sign-off
Functional escalations
- Route issues to specialized teams based on expertise
- Think database issues to DBAs, network problems to NetOps
- Follow skill matrices rather than org charts
- Essential for complex technical problems
Time-based escalations
- Trigger automatically after specific time thresholds
- Example: Level 1 → Level 2 after 30 minutes without resolution
- Often tied to SLA commitments
- Critical for maintaining response time standards
Impact-based escalations
- Scale based on number of affected users or systems
- Higher impact = faster escalation to senior teams
- Useful for prioritizing resource allocation
- Help maintain focus on business-critical issues
Interestingly, companies like Netflix use a hybrid approach. They combine functional routing (to get the right expertise) with impact-based escalation (to ensure appropriate urgency). This way, critical issues land immediately with senior specialists, while routine problems follow standard paths.
Follow-the-sun / distributed team strategies
For organizations with global teams, escalation policies must account for time zone differences and ensure 24/7 coverage:
Global coverage windows:
- Americas shift: 6 AM - 6 PM EST (covers North and South America)
- EMEA shift: 6 AM - 6 PM CET (covers Europe, Middle East, Africa)
- APAC shift: 6 AM - 6 PM JST (covers Asia-Pacific region)
Handoff protocols:
- Each region maintains a handoff document with current incident status
- Escalation managers coordinate cross-timezone transfers
- Critical incidents maintain continuous coverage with overlap periods during shift changes
Whatever types you choose, make them crystal clear to everyone involved. Your team should never have to guess whether something needs escalation or where it should go.
Escalation in multi-tenant / MSP environments
Managed-service providers juggle multiple clients, each with its own SLA. Tips:
- Namespace everything: prepend tenant ID to alert names (
acme-db-latency-high). - Tenant-aware queues: separate escalation policies per client to avoid cross-pollination.
- Per-tenant status pages: Hyperping lets you spin up branded pages on sub-domains in minutes.
- Contract-driven triggers: a fintech client’s SEV2 may outrank another’s SEV1—reflect that in your rule weights.
- Data isolation: audit logs must show that only tenant-specific personnel accessed incident data.
Result: SLA breaches drop, and you avoid embarrassing “wrong-client” notifications.
Escalation path: how incidents flow from detection to resolution
An escalation path is the predefined route an incident follows as it moves through your organization — from initial detection to final resolution. Unlike escalation types (which define why you escalate), an escalation path maps the who and where at every step.
Getting your escalation path right means nobody wastes time wondering "who do I call next?" during a live incident.
Anatomy of an escalation path
Every escalation path has four building blocks:
| Component | Purpose | Example |
|---|---|---|
| Entry point | Where the incident enters the system | Monitoring alert, customer ticket, manual report |
| Tiers / nodes | The people or teams that handle the incident at each stage | L1 support → L2 engineering → L3 SRE → L4 executive |
| Transition rules | Criteria that move the incident to the next node | Time elapsed, severity change, skill requirement |
| Exit point | Resolution, closure, or post-incident review | Fix deployed, customer notified, post-mortem scheduled |
Escalation path diagram
Here's what a typical escalation path looks like for a SEV1 incident:
                        ┌─────────────┐
                        │  ALERT FIRES │
                        └──────┬──────┘
                               │
                               ▼
                     ┌────────────────────┐
                     │  L1: ON-CALL ENG   │
                     │  Acknowledge &     │
                     │  initial triage    │
                     └────────┬───────────┘
                              │
                    ┌─────────┴─────────┐
                    │                   │
               Can resolve?        Cannot resolve
                    │                   │
                    ▼                   ▼
              ┌───────────┐   ┌────────────────────┐
              │  RESOLVE  │   │  L2: SPECIALIST    │
              │  & close  │   │  Deep diagnosis,   │
              └───────────┘   │  config changes    │
                              └────────┬───────────┘
                                       │
                             ┌─────────┴─────────┐
                             │                   │
                        Can resolve?        Cannot resolve
                             │                   │
                             ▼                   ▼
                       ┌───────────┐   ┌────────────────────┐
                       │  RESOLVE  │   │  L3: SENIOR ENG /  │
                       │  & close  │   │  SRE TEAM          │
                       └───────────┘   │  Code fixes, infra │
                                       │  changes, vendor   │
                                       └────────┬───────────┘
                                                │
                                      ┌─────────┴─────────┐
                                      │                   │
                                 Can resolve?     Needs exec decision
                                      │                   │
                                      ▼                   ▼
                                ┌───────────┐   ┌────────────────────┐
                                │  RESOLVE  │   │  L4: MANAGEMENT    │
                                │  & close  │   │  Resource approval,│
                                └───────────┘   │  vendor escalation,│
                                                │  customer comms    │
                                                └────────┬───────────┘
                                                         │
                                                         ▼
                                                   ┌───────────┐
                                                   │  RESOLVE  │
                                                   │  & close  │
                                                   └───────────┘

         ── At every tier ──────────────────────────────────
         • Auto-escalate if no ACK within SLA window
         • Update status page & stakeholders
         • Log actions in incident timeline
Escalation path examples by scenario
Different incident types follow different paths. Here are three common patterns:
Path A — Infrastructure outage (hierarchical)
Monitoring alert → On-call SRE → Senior SRE → Infrastructure lead → CTO
Best for: server outages, network failures, cloud provider issues. Each tier has progressively more authority to approve emergency changes.
Path B — Customer-reported bug (functional)
Support ticket → L1 Support → Product engineering → QA → Release manager
Best for: application bugs, feature regressions, UX issues. The path follows expertise rather than seniority.
Path C — Security incident (hybrid)
SIEM alert → Security analyst → Security lead → CISO → Legal + CEO
Best for: data breaches, unauthorized access, compliance violations. Combines functional expertise with hierarchical authority for decisions with legal or regulatory impact.
Building your own escalation path
Follow these steps to design an escalation path for your organization:
- Map your incident types — List the 5-10 most common incident categories your team handles
- Identify the right people for each tier — Who has the skills and authority at each level?
- Define transition rules — What triggers movement to the next tier? (time, severity, skill gap)
- Set time limits per tier — How long should each tier work before escalating? (e.g., L1: 15 min, L2: 30 min)
- Add parallel notification paths — Who else needs to know at each stage? (status page, account managers, executives)
- Document and test — Write it down, run a drill, and refine based on what breaks
TIP: Your escalation paths should be living documents. Review them quarterly and after every major incident. What looked right on paper often needs adjustment after real-world pressure-testing. For a ready-to-use framework you can customize, check out our escalation procedure template.
Set response and resolution timeframes
This is where rubber meets road. Without clear timeframes, your escalation policy is just a bunch of good intentions.
But here's the tricky part: set them too aggressive, and you'll burn out your team. Too lenient, and your customers suffer. You need that sweet spot where speed meets sustainability.
Response and resolution targets by severity
| Severity | Response time | Resolution target | Escalation threshold | Business impact |
|---|---|---|---|---|
| SEV1 (Critical) | 15 minutes or less | 2 hours | Escalate if no progress in 1 hour | Complete outage, >50% users affected |
| SEV2 (High) | Within 30 minutes | 4 hours | Escalate if no progress in 2 hours | Major features down, significant user impact |
| SEV3 (Medium) | Within 2 hours | 8 hours | Escalate if no progress in 4 hours | Minor bugs, isolated issues |
| SEV4 (Low) | Next business day | 48 hours | Escalate if no progress in 24 hours | Cosmetic issues, feature requests |
These resolution targets directly impact your Mean Time To Resolution (MTTR), a crucial metric for measuring your team's incident response effectiveness. Learn more about optimizing your MTTR in our comprehensive guide.
To get a fuller picture of how to measure success, it's also helpful to understand a range of customer service KPIs that can complement your escalation framework.
TIP: Use our SLA calculator to determine appropriate response and resolution times based on your business needs and customer expectations.
But don't stop there. You need to consider different scenarios:
Business hours handling
| Time period | Coverage level | Response adjustment | Escalation path |
|---|---|---|---|
| Business hours (9 AM - 6 PM) | Full team available | Standard response times | Normal escalation chain |
| After hours (6 PM - 9 AM) | On-call engineer | +50% response time for SEV2+ | Direct to senior on-call |
| Weekends | Emergency response team | Critical and high only | Streamlined escalation |
| Holidays | Skeleton crew | SEV1 only unless pre-approved | Executive approval required |
Customer tier considerations
- Enterprise: Premium response times
- Business: Standard SLA targets
- Basic: Best effort response
Companies like Atlassian have mastered this by using what they call "smart SLAs": different timeframes for different customers, products, and issue types.
They've found it reduces stress on their teams while still meeting customer expectations.
Make them realistic, document them clearly, and review them regularly based on actual performance data.
A tool like Hyperping will monitor uptime and send you weekly reports.
ROI: Metrics and business case
Implementing proper escalation timeframes delivers measurable business value:
MTTR improvements:
- Organizations with defined escalation policies see 30-50% faster incident resolution
- Average cost per hour of downtime ranges from $5,600 for small businesses to $540,000 for enterprises
- Reducing MTTR by just 30 minutes can save thousands per incident
Cost-benefit calculation:
Annual savings = (Incident frequency × MTTR reduction in hours × Cost per hour of downtime) - Implementation costs
Example: (50 incidents/year × 0.5 hours saved × $10,000/hour) - $25,000 setup = $225,000 annual savings
Key metrics to track:
- Mean Time To Acknowledge (MTTA)
- Mean Time To Resolution (MTTR)
- Escalation frequency by severity
- Customer satisfaction scores during incidents
- On-call engineer burnout metrics
On-call health metrics: keeping burnout at bay
Reliability at the cost of engineer exhaustion is a false economy.
| Metric | Healthy range | Red flag |
|---|---|---|
| Escalations / 24 h per on-caller | ≤ 4 | > 7 |
| After-hours pages / week | ≤ 2 | > 5 |
| Sleep-interrupt pages / month | 0–1 | ≥ 3 |
| Rotation fairness (std-dev of pages by engineer) | < 1.5 | ≥ 3 |
Tactics:
- Page once, escalate once: repeated pings for the same alert inflate load.
- Quiet hours: auto-silence SEV4 outside business hours.
- Follow-the-sun analytics: shift heavy paging services to the region that’s awake.
- Recovery days: mandatory day-off after a SEV1 night.
Healthy humans respond faster than zombie engineers—protect them.
Validate your policy: chaos days & escalation drills
Building a policy is step one; battle-testing it is where the real confidence comes from.
1. Chaos day
- Pick one day per quarter.
- Inject simulated failures (latency spike, DB failover) during business hours.
- Observe whether triggers fire, auto-escalation kicks in, and war-room comms stay clear.
2. Table-top exercise
- Gather key roles in a room (or Zoom).
- Walk through a hypothetical SEV1 timeline minute-by-minute.
- Document decision bottlenecks and policy blind spots.
3. Scorecard
| Metric | Target | Observed |
|---|---|---|
| MTTA (drill) | ≤ 5 min | … |
| Correct tier reached | 100 % | … |
| Escalation hand-offs | ≤ 2 | … |
4. Retro & policy patch
Feed findings straight into runbook updates, training modules, and automation rules. Treat every drill like a mini-incident with its own blameless review.
Provide training and resources
Think about this:
- What if your team members aren't sure when to escalate an issue?
- What if they're hesitating because they don't know the proper procedures?
- And what happens when new team members join without proper training?
Getting your escalation policy right is only half the battle. Without proper training and resources, even the best-designed policy can fall flat, leading to delays, confusion, and frustrated customers.
Training components and methods
| Training type | Frequency | Target audience | Key outcomes |
|---|---|---|---|
| New hire onboarding | Within first week | All new team members | Understand escalation criteria and procedures |
| Scenario-based workshops | Monthly | Entire support team | Practice decision-making under pressure |
| Policy updates training | After each policy change | Affected teams | Stay current with new procedures |
| Cross-team shadowing | Quarterly | Junior staff | Learn from experienced colleagues |
The good news? There are several practical ways to ensure your team feels confident and capable when handling escalations.
Which, in practical terms, means...
- Making training an ongoing priority, not just a one-time event. Regular sessions keep procedures fresh in everyone's mind and help address new scenarios as they emerge. For instance, you might run monthly workshops where teams practice handling different types of escalations through role-playing exercises.
- Creating easily accessible documentation that team members can reference quickly. This isn't about lengthy manuals nobody reads – think quick reference guides, decision trees, or even simple checklists that guide people through the escalation process step by step.
- Using real-world examples in your training materials. Nothing beats learning from actual incidents. When you review past escalations, team members can see exactly what worked, what didn't, and how they should handle similar situations in the future.
- Setting up a buddy system for new team members. Pair them with experienced colleagues who can guide them through their first few escalations. This hands-on approach often works better than any formal training session.
Training resources and documentation
Quick reference materials:
- Escalation decision flowcharts
- Contact directories with backup options
- Severity classification guides
- Communication templates for different scenarios
Hands-on training tools:
- Simulated incident environments
- Role-playing exercises with different escalation scenarios
- Post-incident review sessions to extract lessons learned
- Cross-functional workshops with other departments
Why does this matter for your escalation policy?
When your team feels confident about handling escalations, they're more likely to make the right decisions at the right time. They won't hesitate when action is needed, and they won't escalate unnecessarily either. This means faster resolution times, better customer satisfaction, and less stress for everyone involved.
In other words, proper training and resources are what makes it work in practice.
Escalation matrix template
Having a clear escalation matrix eliminates confusion about who to contact when incidents occur. This template provides a structured approach to routing different types of issues to the appropriate teams and individuals.
Basic escalation matrix
| Issue type | Severity | Primary contact | Secondary contact | Manager | Executive |
|---|---|---|---|---|---|
| Server outage | SEV1 | Infrastructure team lead | Senior SRE engineer | IT director | CTO |
| Database issues | SEV1/SEV2 | Database administrator | Senior database engineer | Data team manager | CTO |
| Security incident | SEV1 | Security team lead | CISO | Security director | CEO + CTO |
| Payment processing | SEV1/SEV2 | Payment team lead | Senior payment engineer | Finance director | CFO + CTO |
| API degradation | SEV2/SEV3 | API team lead | Senior backend engineer | Engineering manager | CTO |
| UI/UX issues | SEV3/SEV4 | Frontend team lead | Senior frontend engineer | Product manager | CPO |
Contact information template
| Role | Primary method | Secondary method | Response time | Backup contact |
|---|---|---|---|---|
| Infrastructure lead | Phone: +1-XXX-XXX-XXXX | Slack: @infra-lead | < 10 minutes | Senior SRE |
| Database admin | Phone: +1-XXX-XXX-XXXX | Email: dba@company.com | < 15 minutes | DB team lead |
| Security lead | Phone: +1-XXX-XXX-XXXX | Encrypted comms | < 5 minutes | CISO |
| Payment team | Phone: +1-XXX-XXX-XXXX | Slack: @payments-oncall | < 10 minutes | Finance director |
Customization tips:
- Add specific team Slack channels or Microsoft Teams channels
- Include time zone information for distributed teams
- Update contact methods quarterly to ensure accuracy
- Create separate matrices for business hours vs. after-hours coverage
Post-incident reviews & continuous improvement
The real learning happens after the fire is out. Post-incident reviews transform painful experiences into valuable improvements for your escalation policy.
Blameless post-mortem framework
Key principles:
- Focus on systems and processes, not individual blame
- Assume everyone acted with good intentions given the information available
- Identify contributing factors rather than root causes
- Generate actionable improvements, not finger-pointing
Post-incident review structure
| Section | Questions to answer | Time allocation |
|---|---|---|
| Timeline | What happened when? Who was involved? | 20% |
| Impact assessment | How many users affected? Revenue impact? | 15% |
| Response effectiveness | Did escalation work? What delayed resolution? | 25% |
| Contributing factors | What systemic issues contributed to this incident? | 25% |
| Action items | What specific changes will prevent recurrence? | 15% |
Feeding lessons back into your escalation policy:
- Runbook updates: Document new escalation paths discovered during incidents
- Training improvements: Address knowledge gaps revealed during response
- Policy refinements: Adjust severity thresholds based on actual incident impact
- Tool enhancements: Invest in better monitoring or communication tools
- Team structure changes: Modify on-call rotations or team responsibilities
Making improvements stick:
- Assign specific owners to each action item with deadlines
- Track completion in your incident management system
- Review past action items in subsequent post-mortems
- Share learnings across teams to prevent similar issues elsewhere
Compliance & regulatory expectations
Many industries have specific requirements for incident escalation that go beyond internal operational needs. Understanding these compliance requirements helps ensure your escalation policy meets both business and regulatory standards.
Governance, audit trails, and evidentiary readiness
Regulators no longer accept “the logs were lost.” Your escalation system must be forensically sound.
- Immutable logging – write escalation events to an append-only datastore (e.g., object storage with WORM).
- Cryptographic hashes – sign every incident timeline export; verify during audits.
- Automated SIEM export – push escalation metadata (who/when/what) to your SOC’s SIEM hourly.
- Retention schedule – keep SEV1/SEV2 logs ≥ 7 years if you touch finance or healthcare data.
- Evidence kit – one-click bundle of timeline, chat transcript, and remediation commits for legal.
Regulatory requirements by framework
| Regulation | Escalation requirements | Timeline mandates | Documentation needs |
|---|---|---|---|
| GDPR | Data breach escalation to DPA within 72 hours, customer notification if high risk | 72 hours to authorities, 30 days to affected individuals | Complete incident timeline, impact assessment, remediation steps |
| HIPAA | PHI breach notification to covered entities and individuals | 60 days for breach notification | Risk assessment, affected records count, mitigation measures |
| SOC 2 | Security incidents must follow documented response procedures | Varies by commitment | Incident response procedures, evidence of compliance |
| PCI-DSS | Payment card data incidents require immediate containment and notification | Immediate containment, forensic investigation | Chain of custody documentation, remediation evidence |
Compliance-focused escalation elements
Required components for regulated industries:
- Executive notification paths for compliance officer and legal counsel
- External notification procedures (regulators, law enforcement, customers)
- Evidence preservation protocols during incident response
- Audit trail maintenance throughout the escalation process
- Regular compliance review and testing of escalation procedures
Key considerations:
- Legal review of escalation procedures before implementation
- Regular training on regulatory requirements for escalation team members
- Integration with legal and compliance team communication channels
- Documentation retention policies that meet regulatory standards
Best practices for escalation policies
While every organization is unique, certain fundamental practices have proven to be consistently effective.
ICS-style role mapping
For organizations managing complex incidents, adopting roles similar to the Incident Command System (ICS) can provide clear structure:
| ICS role | Corporate equivalent | Escalation responsibility |
|---|---|---|
| Incident commander | Escalation manager | Overall incident coordination and escalation decisions |
| Operations chief | Technical lead | Technical response and engineering team coordination |
| Liaison officer | Customer success manager | External stakeholder communication |
| Information officer | Communications manager | Public communications and status updates |
Here are the key practices to have in mind:
- Flexible policy implementation — Treat the policy as a guideline, allowing teams to adapt their response based on unique situations and circumstances.
- Regular schedule auditing — Perform consistent reviews of on-call schedules to maintain proper coverage and prevent gaps in support availability.
- Smart threshold setting — Establish clear, severity-based thresholds for escalation to ensure appropriate response levels for different types of incidents.
- Clear escalation process — Define a straightforward process that outlines specific steps and contact methods for reaching the next support level.
- Centralized tracking system — Implement a single system to monitor and document all escalations, promoting transparency and accountability.
- Stakeholder communication — Maintain open lines of communication with all involved parties throughout the incident resolution process.
- Cross-team collaboration — Foster an environment where teams work together effectively to address and resolve complex technical challenges.
Escalation policy glossary: key terms explained
Understanding the terminology behind escalation policies helps your team communicate precisely during incidents — and helps you design better policies from the start. Here's a comprehensive glossary of every term you'll encounter.
Core escalation concepts
- Escalation policy: A documented set of rules that defines when, how, and to whom incidents should be escalated based on severity, time elapsed, and impact. It's the overarching framework that governs your entire incident response workflow.
- Escalation protocol: The specific step-by-step procedure followed during an escalation — who to contact, in what order, through which channel, and what information to include. While a policy sets the rules, a protocol defines the execution. For more detail, see our escalation protocol guide.
- Escalation process: The end-to-end lifecycle of an escalation from initial trigger to final resolution, including detection, triage, handoff, resolution, and post-incident review.
- Escalation path: The predefined route an incident follows as it moves through your organization's support tiers — from first responder to final resolver. Each incident type may have a different path. See the escalation path section above for diagrams and examples.
- Escalation chain: The ordered sequence of individuals or teams contacted during an escalation. Similar to an escalation path but emphasizes the people rather than the process. Example: on-call engineer → team lead → engineering manager → VP Engineering.
- Escalation route: A synonym for escalation path, typically used when referring to the channel or direction an issue takes. Different incident categories (infrastructure, security, billing) often have separate routes.
- Escalation matrix: A reference table that maps incident types and severity levels to specific contacts, response times, and communication channels. Think of it as the quick-lookup version of your escalation policy. See our escalation matrix template section above.
- Escalation plan: A broader, strategic document that outlines your organization's overall approach to incident escalation — including policies, paths, matrices, training schedules, and review cadences.
Escalation types
- Hierarchical escalation: Moving incidents up the organizational chain of command, typically used when higher authority or decision-making power is required (e.g., team lead → director → VP).
- Functional escalation: Routing incidents to specialized teams based on technical expertise rather than organizational hierarchy, such as database issues going directly to database administrators.
- Time-based escalation: Automatic escalation that occurs when incidents remain unresolved or unacknowledged after predetermined time thresholds (e.g., auto-escalate if no ACK within 15 minutes).
- Impact-based escalation: Escalation triggered by the scope of an incident's effect (number of users, revenue impact) rather than technical complexity.
- Auto-escalation: The automatic promotion of an incident to the next tier when predefined conditions are met (typically time-based), without requiring manual intervention. Most incident management tools support auto-escalation rules.
- Immediate escalation: Bypassing lower tiers entirely and routing an incident directly to senior staff or executives — reserved for critical scenarios like security breaches, complete outages, or regulatory incidents.
- Proactive escalation: Escalating an issue before it triggers formal thresholds, based on an engineer's judgment that the situation is trending toward a bigger problem. Encouraged in high-reliability organizations.
Triggers and thresholds
- Escalation trigger: A specific, measurable condition that initiates an escalation — such as exceeding a response time SLA, hitting an error rate threshold, or receiving multiple customer reports about the same issue.
- Escalation threshold: The quantitative boundary that, when crossed, activates an escalation trigger. Examples: >1,000 affected users, >20% error rate, >15 minutes without acknowledgment. Setting thresholds too low causes alert fatigue; too high causes missed incidents.
- Escalation criteria: The full set of conditions evaluated when deciding whether to escalate — including severity, impact, time elapsed, customer tier, and business context. Broader than a single threshold.
- Severity levels: Classification system (typically SEV1–SEV4) that categorizes incidents based on business impact and determines appropriate escalation paths and response times.
- Alert fatigue: When team members become overwhelmed by too many notifications and start ignoring them, often caused by poorly configured escalation thresholds or overly sensitive monitoring.
Roles and structure
- Escalation manager: A designated role responsible for coordinating escalation decisions, ensuring proper handoffs between teams, and monitoring SLA compliance during incidents.
- Incident commander: The person responsible for coordinating overall incident response, making escalation decisions, and ensuring effective communication across teams.
- Escalation ladder: A visual representation of your escalation hierarchy, showing ascending levels of authority and expertise — from front-line support at the bottom to executive leadership at the top.
- Escalation list: A maintained roster of contacts organized by escalation tier, specialization, and availability — including primary contacts, backups, and their preferred communication methods.
- On-call rotation: A scheduled system where team members take turns being available for after-hours incident response and escalation decisions.
- Follow-the-sun support: A global support model where incident response responsibilities are handed off between teams in different time zones to provide 24/7 coverage.
Metrics and measurement
- Mean Time To Acknowledge (MTTA): The average time between when an incident is reported and when someone begins working on it, a key metric for escalation effectiveness.
- Mean Time To Resolution (MTTR): The average time from incident detection to full resolution. Well-designed escalation policies directly reduce MTTR.
- Escalation frequency: How often incidents are escalated beyond the first tier — high frequency may indicate undertrained L1 staff or miscalibrated severity thresholds.
- Error budget: The acceptable amount of service disruption before violating service level objectives, used to balance feature development velocity with system reliability.
Documentation and tools
- Runbook: Documented procedures that outline step-by-step response actions for specific types of incidents, including escalation criteria and contact information.
- Escalation template: A pre-formatted document or form used to standardize how escalations are reported and tracked — ensuring consistent information capture across incidents. See our escalation procedure template for a ready-to-use example.
- Escalation log: A chronological record of all escalation actions taken during an incident, including timestamps, decisions made, and people involved. Essential for post-mortems and compliance audits.
- Service Level Agreement (SLA): A contract with customers that defines guaranteed service levels and penalties for failures, often driving escalation urgency requirements.
- Blameless post-mortem: An incident review process that focuses on understanding systemic issues and improving processes rather than assigning individual blame for failures.
- Decision tree: A flowchart-style diagram that guides responders through a series of yes/no questions to determine the correct escalation action for a given situation.
Quick-start checklist
Ready to build your escalation policy from scratch? Follow this actionable checklist to go from zero to a working escalation framework:
Week 1: Foundation
- Define severity levels — Create SEV1-SEV4 categories with specific criteria (>50% users affected = SEV1)
- Map your current team structure — Document existing support tiers and their capabilities
- Identify key stakeholders — List who needs to be involved in escalations (managers, technical leads, executives)
- Audit current tools — Assess your monitoring, communication, and ticketing systems
Week 2: Structure and processes
- Create escalation matrix template — Build a table showing who handles what types of incidents
- Set response timeframes — Define response and resolution targets for each severity level
- Choose communication channels — Designate specific channels for different urgency levels (Slack for SEV2, phone calls for SEV1)
- Document escalation types — Define when to use hierarchical, functional, time-based, or impact-based escalations
Week 3: Automation and training
- Implement basic automation — Set up auto-escalation after time thresholds in your monitoring tools
- Create quick reference guides — Build decision trees and checklists for common escalation scenarios
- Schedule team training — Plan hands-on workshops using real incident examples
- Establish on-call rotations — Ensure 24/7 coverage with clear handoff procedures
Week 4: Testing and refinement
- Run escalation simulations — Test your policy with mock incidents across different scenarios
- Set up monitoring and metrics — Track MTTA, MTTR, and escalation frequency
- Plan post-incident review process — Create templates for blameless post-mortems
- Schedule regular policy reviews — Set quarterly reviews to refine based on lessons learned
Ongoing maintenance (monthly)
- Review escalation metrics — Analyze response times and escalation patterns
- Update contact information — Verify phone numbers, Slack handles, and backup contacts
- Conduct scenario training — Practice with new incident types and team members
- Refine automation rules — Adjust thresholds based on performance data
Pro tip: Start with just SEV1 and SEV2 incidents first, then expand to include lower-priority issues once your process is working smoothly. Most organizations see immediate improvement in incident response within the first month of implementing these basics.
Conclusion
Building an effective escalation policy isn't just about having procedures on paper — it's about creating a system that actually works when your team is under pressure and every minute counts.
The most successful organizations recognize that escalation policies are living documents that evolve with their teams, technology, and business needs. They start with clear fundamentals: defined severity levels, structured communication channels, and automated processes that eliminate human error during critical moments.
Your escalation policy should accomplish three things: get the right expertise involved quickly, keep stakeholders informed throughout the process, and capture lessons that improve future response. When these elements work together, you'll see measurable improvements in incident resolution times, team confidence, and customer satisfaction.
Ready to build your escalation framework? Start with the quick-start checklist above, focusing on SEV1 and SEV2 incidents first. Use tools like Hyperping to automate the monitoring and notification aspects so your team can focus on actually solving problems rather than managing communication chaos.
Remember: the best escalation policy is the one your team actually follows during a crisis. Keep it simple, test it regularly, and refine it based on real-world experience. Your future self will thank you when the next critical incident hits and your team responds with confidence instead of confusion.
FAQ
What is an escalation policy? ▼
An escalation policy is a systematic approach to managing and routing incidents or issues to appropriate team members based on severity, time, and expertise. It includes clear triggers, communication protocols, and response procedures to ensure efficient incident resolution and minimize system downtime.
What are the main types of escalation? ▼
There are four main types of escalation: 1) Hierarchical escalations (moving up the chain of command), 2) Functional escalations (routing to specialized teams), 3) Time-based escalations (triggered after specific time thresholds), and 4) Impact-based escalations (scaled based on number of affected users or systems).
What are the recommended response times for different severity levels? ▼
Response times vary by severity: SEV1 (Critical) requires response within 15 minutes, SEV2 (High) within 30 minutes, SEV3 (Medium) within 2 hours, and SEV4 (Low) by next business day. Resolution targets range from 2 hours for critical incidents to 48 hours for low priority issues.
How should organizations structure their support tiers? ▼
Organizations should implement a four-tier support structure: Level 1 (Front-line support) for initial contact and basic troubleshooting, Level 2 (Technical specialists) for complex technical issues, Level 3 (Expert engineers) for system-level problems, and Level 4 (Management and external resources) for critical business decisions and vendor involvement.
What are the key components of effective escalation triggers? ▼
Effective escalation triggers include clearly defined severity levels (SEV1-3), time-based triggers for unacknowledged and unresolved issues, impact thresholds based on affected users or revenue, and customer-driven escalation criteria for VIP requests or explicit escalation requests.
How can organizations prevent alert fatigue in escalation systems? ▼
Organizations can prevent alert fatigue by implementing smart notification routing, setting up automated workflows, defining clear severity levels, establishing proper thresholds, and using tools that support intelligent alert filtering and priority-based notifications.
What role does automation play in escalation policies? ▼
Automation is crucial for efficient escalation policies, handling automatic escalation triggers, smart notification routing, and workflow automation. It helps manage repetitive tasks, ensures consistent response times, and allows teams to focus on actual problem-solving rather than manual processes.
How often should escalation policies be reviewed and updated? ▼
Escalation policies should undergo quarterly reviews at minimum, with additional reviews after major organizational changes, significant incidents, or new system implementations. Regular assessment ensures policies remain effective and aligned with current operations.
What are the essential communication protocols for escalations? ▼
Essential communication protocols include defined channels for urgent incidents (chat platforms, phone calls, SMS), regular updates (email, ticket system, status pages), and stakeholder communications (executive briefings, customer updates). Each channel should have clear documentation requirements and stakeholder communication matrices.
What are common mistakes in escalation policies? ▼
Common escalation policy mistakes include overcomplicated processes, unclear responsibilities, lack of documented procedures, missing backup contacts, failure to account for different time zones, and insufficient training for team members on escalation procedures.